
Estimated reading time: 16 minutes
I enjoy my Native Watercraft Slayer Max Ten Propel kayak, once it’s on the water. Getting it in the water, and out again, is a problem. Although it’s only ten feet long, it’s wide (for a kayak), and weighs about 95 pounds with the pedal drive unit loaded. I’m already resigned to using a trailer instead of car-topping it. But, moving the kayak around is another problem.
After trying out some commercial kayak carts that didn’t work out, I designed and built my own. I ended up with a cart that weighs 9-1/2 pounds, and costs about $100 in parts. This is my “How-To” building a Native Watercraft kayak cart.
General Information
I designed this cart so I could hook it up with my kayak sitting on it’s trailer, haul it to the water, and release the cart from the pier without getting wet up to my waist. I can also hook it up from the pier, then haul the kayak out back onto my trailer. This cart also protects the rudder from dragging on the ground. Finally, since it supports the weight of the kayak (instead of hanging the weight as the Sidekick option offered by Native Watercraft does) there is no stress on the hull or track systems.
Native Watercraft-Specific Design
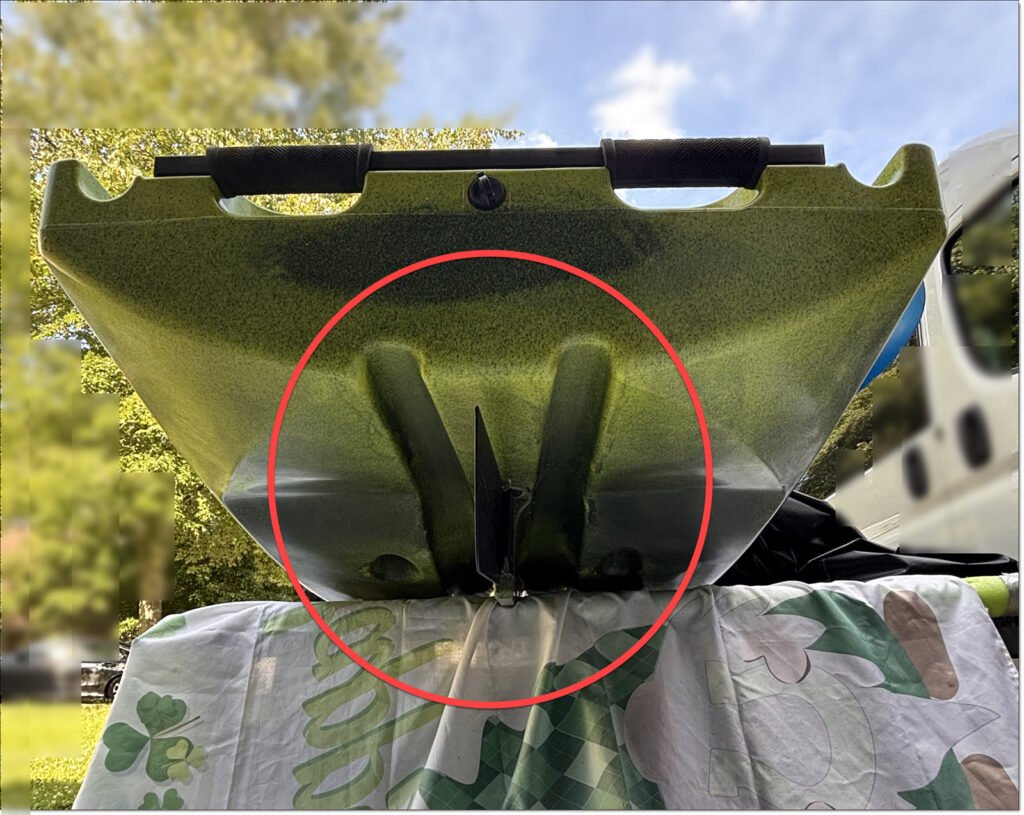
Note this design is specific for the Native Watercraft Slayer Max Ten Propel model. This model has a unique keel feature, which I believe is common to all Native Watercraft models. My design should work for all models, with some adjustment in dimensions. As I step through the instructions I’ll call out which dimensions may require adjusting for other models. Your mileage may vary.
Creative Commons License
![]() I’m making my design, along with the “How-To” instructions, freely available under a creative commons license. This licensing is CC-BY-NC; Licensees may copy, distribute, display, perform and make derivative works and remixes based on it only if they give the author or licensor the credits (attribution) in the manner specified by these (BY). Licensees may copy, distribute, display, perform the work and make derivative works and remixes based on it only for non-commercial purposes (NC).
I’m making my design, along with the “How-To” instructions, freely available under a creative commons license. This licensing is CC-BY-NC; Licensees may copy, distribute, display, perform and make derivative works and remixes based on it only if they give the author or licensor the credits (attribution) in the manner specified by these (BY). Licensees may copy, distribute, display, perform the work and make derivative works and remixes based on it only for non-commercial purposes (NC).
The Kayak Cart
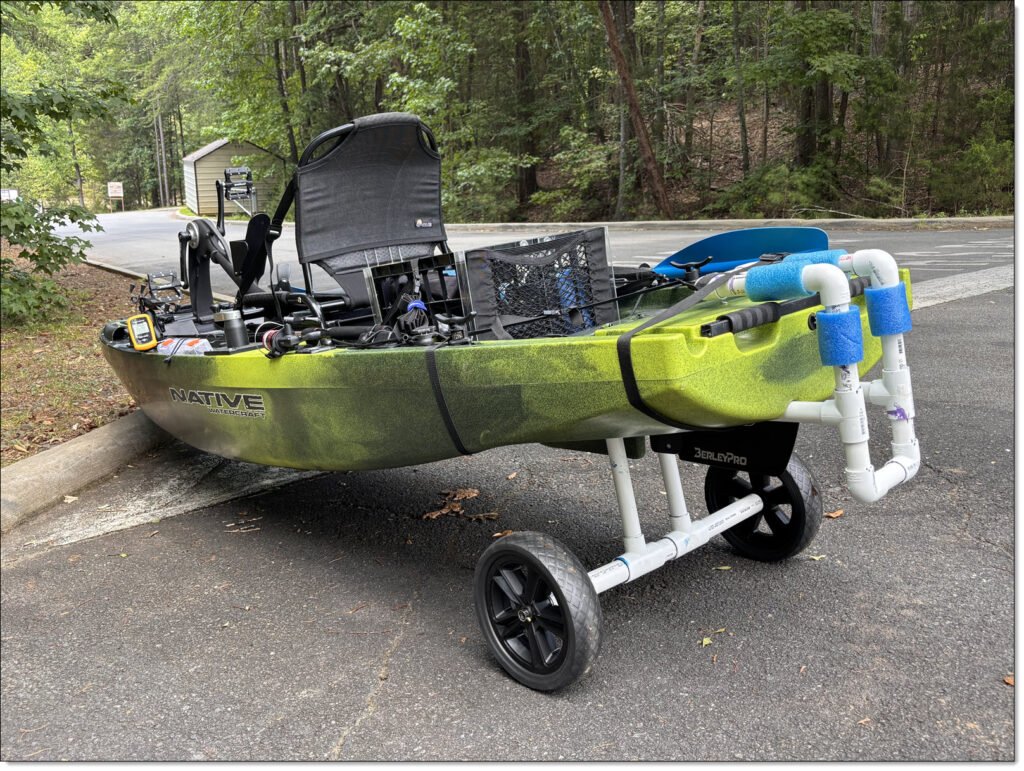
The cart is built of one inch and one-and-a-quarter inch PVC tubing, based upon an inexpensive commercial “” for the wheels and axle. Overall dimensions are 28 inches long, by 28 inches high, by 30 inches from the outer edges of the wheels. Total weight is 9.5 pounds. The wheels can be easily removed (no tools needed) and reinstalled on the axle.

This cart does not use the kayaks’ scupper holes. The Native Watercraft kayaks have a unique keel shape of two channels running the length of the keel, starting about midships. These channels are almost two inches wide at the midships point, narrowing down to one inch at the transom. The manufacturer explains that this shape effectively creates a “catamaran” effect and increases stability. These two channels also offer an excellent way of holding a cart in position.
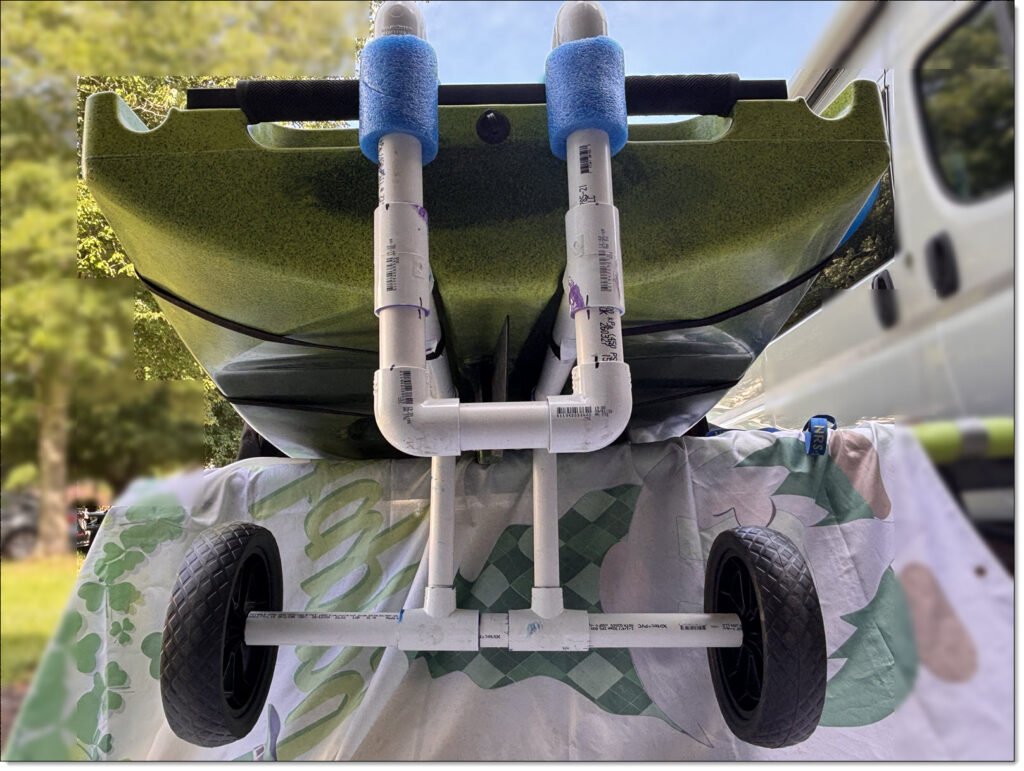
The upper “hook” helps hold the cart in position while the two straps are connected, which ultimately hold the cart in position. I used pool noodles for padding in key places, both to protect the kayak hull and help hold the cart in position. The lower “U” bar protects the rudder from scraping on the ground, and adds lateral strength to the cart. Two nylon straps wrapped around the hull hold the cart securely in place while in use.
Wheels and Axle
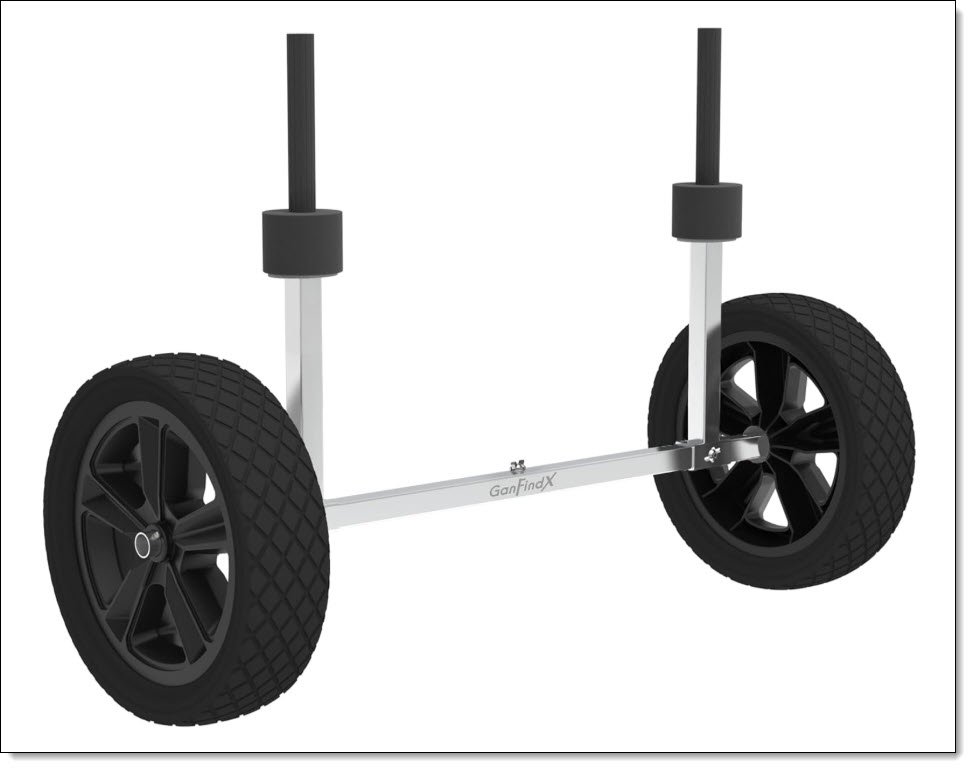
I used an inexpensive, GanFindX brand, commercial kayak cart for the axle and wheels. This cart was designed to mount into a kayaks’ scupper holes. I discarded the vertical scupper mounts, which gave me the perfect set of wheels and axles.
This axle is advertised as stainless steel, and the cart is advertised to support up to 240 lbs. The wheels pop off without needing any tools. This cart offers options for 8-inch or 11-inch wheels. I used the 11-inch size, on basis that bigger would be better for sand. Dimensions of my cart’s PVC frame is based on the 11-inch wheel size.
This axle runs inside PVC tubing that connects to the upper support tubing. My instructions show how to lock the square axle inside a round tube.
Construction Notes
This cart is built of PVC pipe cemented into PVC elbows and “T” fittings.
Most PVC pipe dimensions are critical for this cart to work properly. The socket portion of the PVC elbows and “T” fittings tend to vary between 3/4 to one inch. I’ve also observed that the pipe will go deeper into the fitting sockets with cement applied, then if I am dry-fitting the pieces.
I’ve shown the pipe dimensions between the edges of the fittings and overall lengths. I found it’s best to use some blue painters tape to mark how deep a piece of pipe needs to be inserted into a fitting socket while dry fitting.
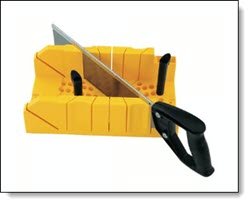
I used a hand saw with miter box to make my PVC pipe cuts.
Materials List
| Item | Quantity | Source |
|---|---|---|
| GanFindX Kayak Cart with 11-inch Kayak Wheels | 1 Each | Amazon.com |
| Pan Head Phillips Machine Screw, Stainless Steel, Metric, M6 – 1.0 x 12mm | 1 Each | Specialty Hardware Store |
| 1-1/4″ Schedule 40 PVC Pipe | 24 Inches (2 feet) [1] | Big Box Home Improvement Center |
| 1″ Schedule 40 PVC Pipe | 120 Inches (10 feet) [1] | Big Box Home Improvement Center |
| PVC “T”, 1-1/4″ x 1-1/4″ x 1″ | 2 Each | Big Box Home Improvement Center |
| PVC “T”, Schedule 40, 1″ x 1″ x 1″ | 4 Each | Big Box Home Improvement Center |
| PVC Elbow, Schedule 40, 1″ x 1″ | 6 Each | Big Box Home Improvement Center |
| PVC Primer and Cement Kit | 1 Kit | Big Box Home Improvement Center |
| Pool Noodle, 1/2″ hollow center | 1 Each | Discount Department Store or Sporting Goods Store |
| Ten foot one-inch wide cam strap | 2 Each | Amazon.com |
| Self-Drilling Hex Head Screws w/Washer, #8 x 9/16″ | 4 Each | Specialty Hardware Store |
| 1″ Wide Painters Masking Tape (Blue) | 1 Roll | Big Box Home Improvement Center |
| Sharpie Fine Tip Black Marker | 1 Each | Office Supply |
[1] This allows some extra length for scrap.
Assembly
Open the box containing the GanFindX Kayak Cart. Discard the two upright scupper supports. Retain the two axle pieces, two wheels, and two end washers. Discard the butterfly screw that holds the two pieces of axle together. Temporarily use painters tape to hold the two axle pieces together. Later, you’ll use the M6 – 1.0 x 12mm screw.
PVC Pipe Pieces
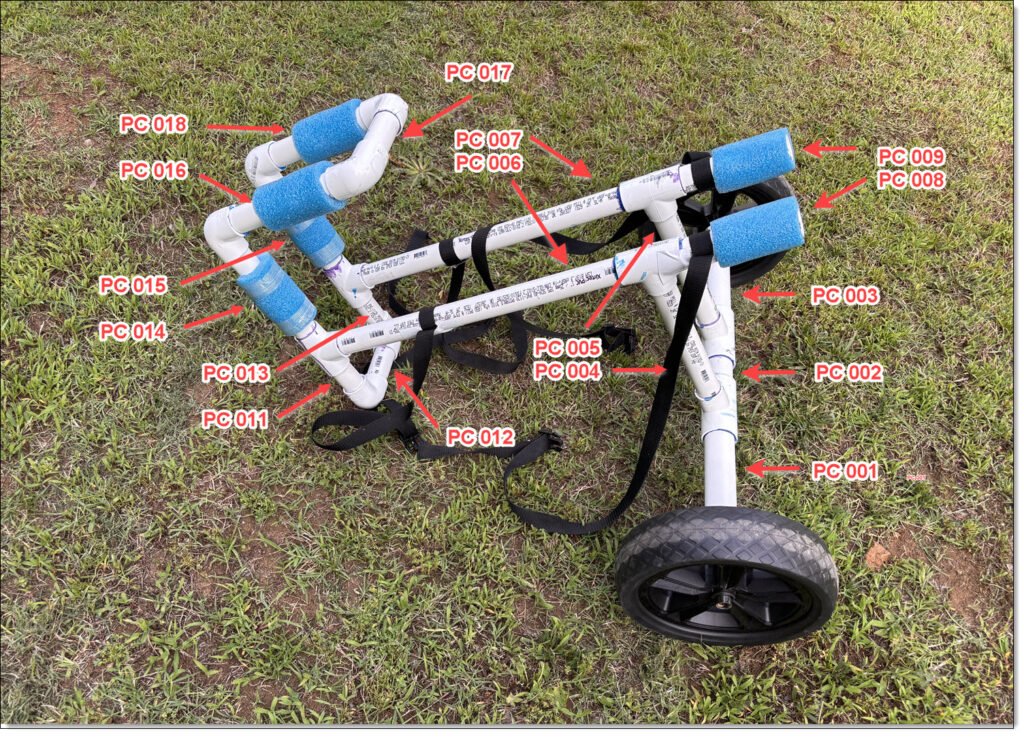
The chart dimensions show actual cut length, and finished dimensions after inserting into fittings. (Note there is no piece 010.)
| Pipe Diameter | Piece Number(s) | Dimensions |
|---|---|---|
| 1-1/4″ | 001 and 003 | 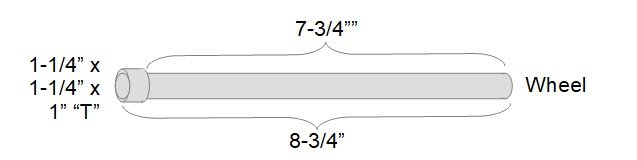 |
| 1-1/4″ | 002 | 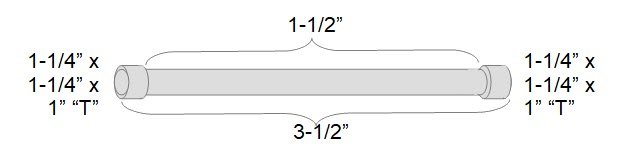 |
| 1″ | 004 and 005 | 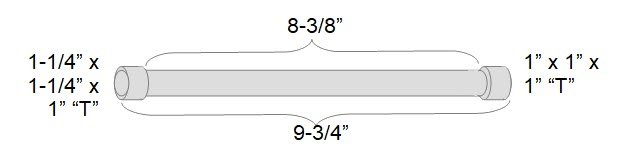 |
| 1″ | 006 and 007 | 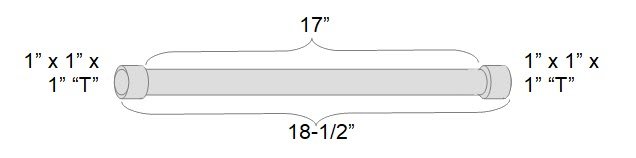 |
| 1″ | 008 and 009 | 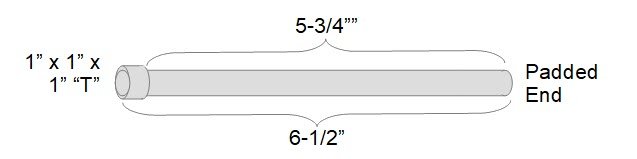 |
| 1″ | 011 and 013 | 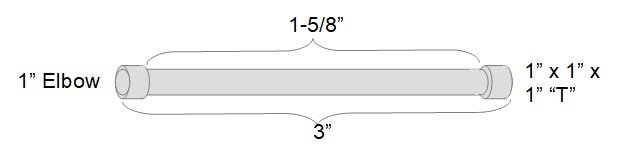 |
| 1″ | 012 and 017 | 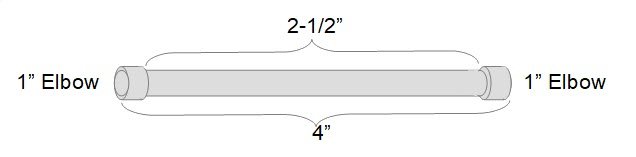 |
| 1″ | 014 and 015 | 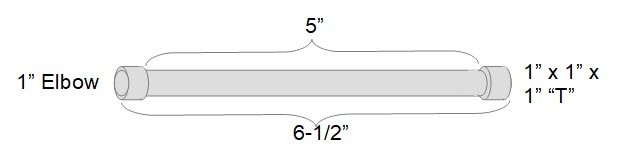 |
| 1″ | 016 and 018 |  |
If you want to use this on one of the 12-foot Native Watercraft kayaks, I recommend lengthening pieces 006 and 007 to about 24 inches. This will move the wheels further forward towards the kayak’s center of balance. You may also need to adjust pieces 002, 012, and 017 to keep the “arms” properly aligned in the kayak’s keel channels.
The Axle
Assembling the axle is the most most time-consuming part of this build.
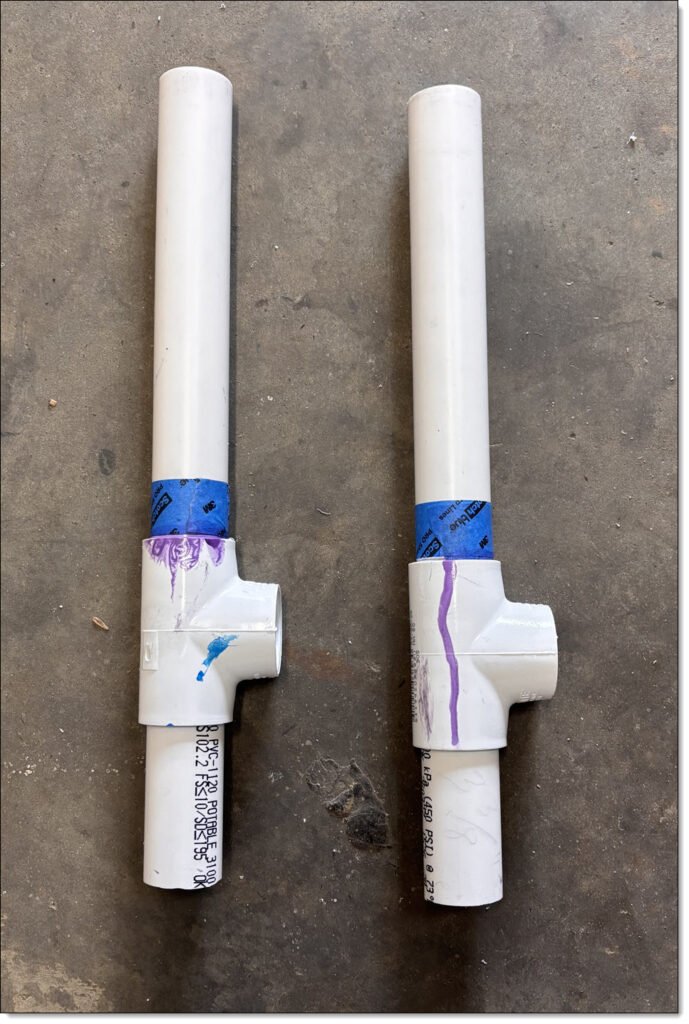
The square axle of the GanFindX Kayak Cart measures one inch across the diagonal. This fits perfectly inside the 1-1/4″ PVC pipe. As the rest of the cart is one inch PVC, the two 1-1/4″ x 1-1/4″ x 1″ “T” fittings adapts the axle to the reat of the PVC frame. You also need to square the inside of the round pipe to lock the axle into position.
The axle uses PVC pieces 001, 002, and 003, and the two 1-1/4″ x 1-1/4″ x 1″ “T”s.
Squaring the Circle
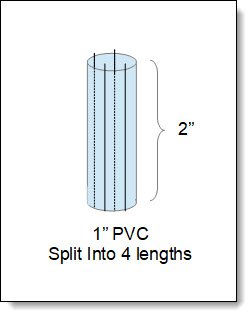
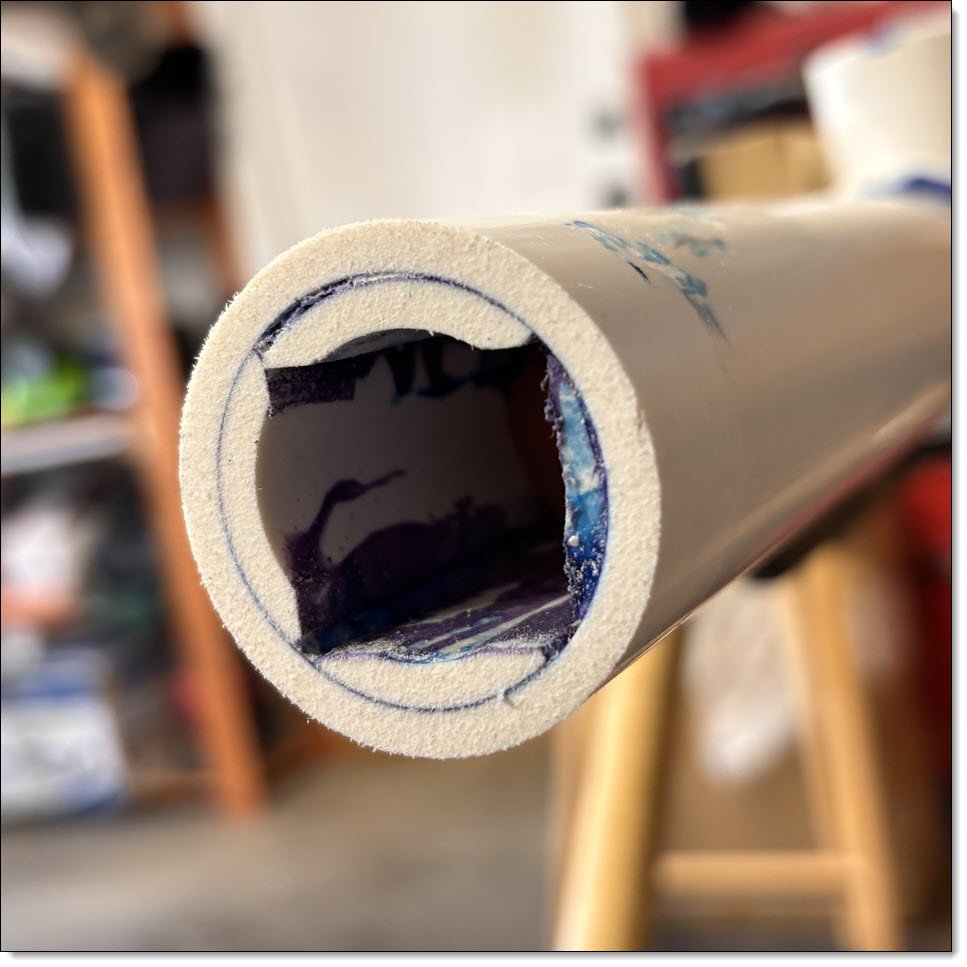
- Cut two 2″ pieces of 1″ PVC Pipe. Using the GanFindX axle as a guide, mark off the four corners on the ends of the pipe with your Sharpie. Extend the lines down the length, then split each piece of pipe lenghtwise into four sections.
- Sand the four pieces of each pipe section flat along the split edges. A hand-held belt sander with 150 grit sandpaper helps (wear gloves as your fingertips will be close to the belt).
- These pieces fit into the inside ends of pieces 001 and 003. Use the GanFindX axle (wrapped in painters tape to keep the metal cement-free ) as a guide to aligning the four pieces. Using PVC primer and cement, slide each of the four pieces into the pipe ends. Once set-up, this creates a squared inside end that perfectly fits around the square axle.
- The ends need to be smooth and squared off so the wheel washers fit properly. But it’s best to wait until the entire axle assembly is complete, then sand, as the axle length needs to be precise for smooth operation of the wheels.
Assembling The Axle
- Glue piece 001 into a 1-1/4″ x 1-1/4″ x 1″ “T” Fitting. Then glue piece 003 into the other 1-1/4″ x 1-1/4″ x 1″ “T” Fitting. The ends with the squared off interior must be to the outside, not the “T” fitting side.
- Dry fit piece 002 into the “T” ends of each assembly.
- Slide the GanFindX axle through the axle assembly. Twist the two sections until the square axle aligns inside the PVC tubing. Using your Sharpie, put alignment marks on the “T”s and piece 002.
- Glue piece 002 to one “T” section. Allow cement to set-up.
- With the GanFindX axle inside the PVC pipe assembly, cement the other “T” section to the other side of piece 002. Ensure the axle can slide freely inside the PVC assembly.
- Remove the GanFindX axle and remove any painters tape.
Installing the Axle Screw
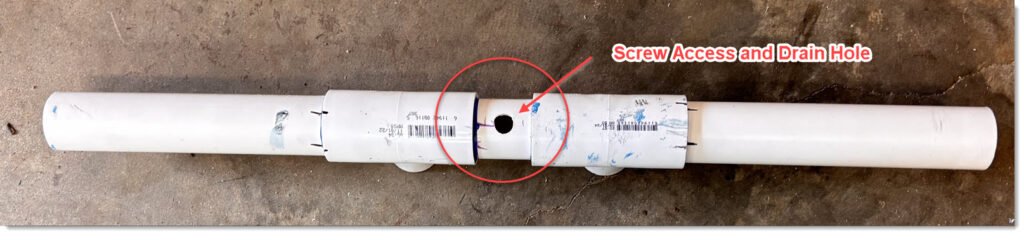
- Reinsert the GanFindX axle with the center screw hole as close to the bottom of the axle assembly as possible. Using your Sharpie, mark where the hole would be on Piece 002.
- Drill a hole large enough to get the machine screw head through. This hole allows the screw to be inserted into the GanFindX axle, and doubles as a drain hole for the assembly.
- Insert the machine screw and tighten on the GanFindX axle. You may want to use some “Blue” Loctite to ensure this screw stays in place.
Fitting the Wheels
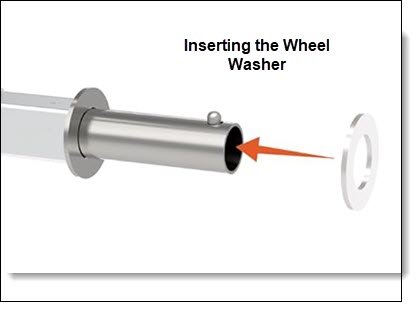
Test fit the wheels and washers on the axle. Sand down the PVC ends if too tight. The wheels should turn freely, without any of the square axle showing past the PVC pipe.
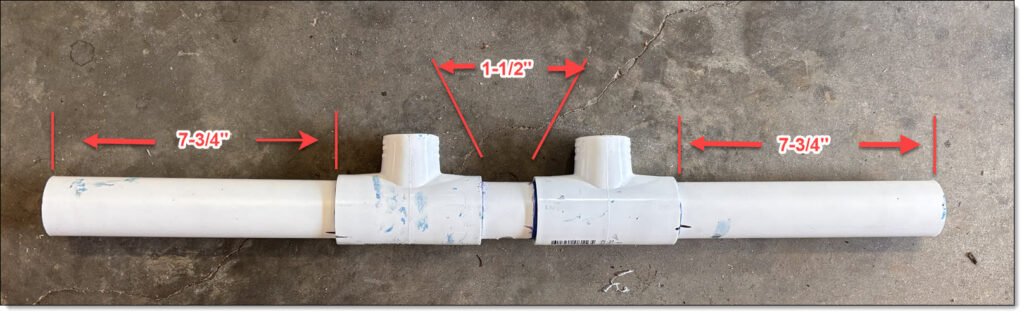
The Rest of the Assembly
The rest of the cart assembly is straightforward pipe assembly. Use the illustration and piece parts list as a guide. It’s best to build each section together to avoid getting confused. One critical piece of this assembly is keeping the “T” and elbows aligned. Recommended assembly sections:
- Pieces 004/006/008 and 005/007/009
- Pieces 011/012/013
- Pieces 016/017/018
Before building the final assembly, be sure to add pool noodle padding as shown. This padding helps protect your boat’s finish, and also helps the cart grip the kayak better.
The Straps
Once your cart is assembled, add the straps. I used two straps, but the strap attached to pieces 008/009 are the most critical. This strap strap holds the forward end snug under the kayak. The “hook” helps hold the cart in place while tightening this strap. The second strap is extra support for the stern.
As I use my prototype, I’m finding that the best use of the second straps is to wrap them through the two rear kayak handles, then connect them behind the vertical section of the “hook.” This seems to help hold the cart on the kayak more effectively.
Installation
Take a cam strap and cut it into two pieces. You should cut so the cam head end of the strap aligns with the top center of the kayak. Be sure to heat-seal the cut ends so the strap material does not unravel. After heat-sealing the ends, melt a pilot hole about 1/2″ from the cut ends. . This helps the screw go through the strap easier.

Position each section of strap on the PVC pipe, then use a #8 x 9/16″ self-drilling hex head screw to fasten it in position.
One set of straps should go just forward of the “T” end on pieces 008 and 009. The second set should be about six inches from the back edge of the cart, on pieces 006 and 007
In Use
Slipe the straps through the cam heads so they’re loose around the kayak hull. Slide the cart on the stern of the kayak so the “arms” slide along the twin channels along the keel. Once the “hook” is engaged, tighten the straps. You can now haul your kayak using the bow handle.
Happy Paddling!
Related Posts
- Review: Native Watercraft Slayer Max 10
- Review: Pelican Clipper 100X Kayak
- Review: HO Sports Beacon Inflatable Kayak
- Boating Hacks: A Kayak Work Stand
- Boating Hacks: Sea Eagle Inflatable Kayaks
- Boating Hacks: A Kayak Light Mast