
Estimated reading time: 13 minutes
If you own one or more kayaks, eventually you’ll need to do some amount of cleaning and maintenance. I’ve found it’s a lot easier to work on my kayaks if they’re at chest height. So, a work stand becomes a useful kayak accessory.
I needed a work stand specifically suited for inflatable kayaks. Most commercial stands are two-piece units which are ideal for hard shells. Inflatables, not so much, as the kayak sags in the middle without proper support. I decided to design and build my own work stand.
Design Constraints
I wanted a simple, inexpensive kayak stand suitable for the boats I own. I have two inflatables and one hardshell, and my hardshell is the heaviest at 47 pounds. So, the stand needed to support at least 50 pounds and provide support across the length of the boats, not just at each end. The work stand needed to fold up when not actually in use. I also needed my stand to be weatherproof, as I expected to be storing it outside and didn’t want it rotting away. Finally, I wanted it simple to build.
After browsing YouTube channels for ideas, I came up with a design made of PVC piping and nylon strapping. This stand will comfortably support a thirteen-foot inflatable kayak but also works well for boats as short as eight feet. Materials should cost about $120.00 (2023 prices), if you already don’t have any of the materials in your shop as scrap. Assembly takes about two hours once you’ve collected all the tools and materials. When folded up, it’s about four inches thick.
Design Notes
Most of the work stands I saw on YouTube were only four feet long. A thirteen-foot low-pressure inflatable kayak just doesn’t sit well on a four-foot-long stand. My personal twist on YouTube designs is to make the work stand seven feet long with midpoint support braces.
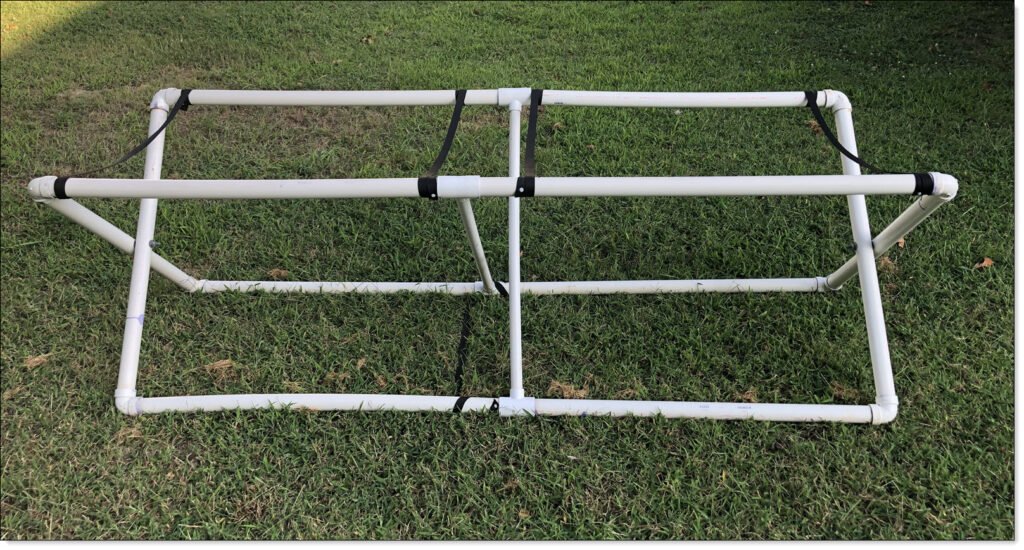
This stand is two frames constructed of seven-foot lengths of 1-1/2″ Schedule 40 PVC pipe, with three-foot risers. One frame is just slightly shorter than the other, so it fits inside the longer frame. Although the frames are three-foot tall, the actual working height is controlled by the spread width. The spread width is controlled by the length of nylon straps.
I could have used wood inside the pipe as reinforcement instead of the center braces. But that would add weight and extra expense over a little more PVC pipe.
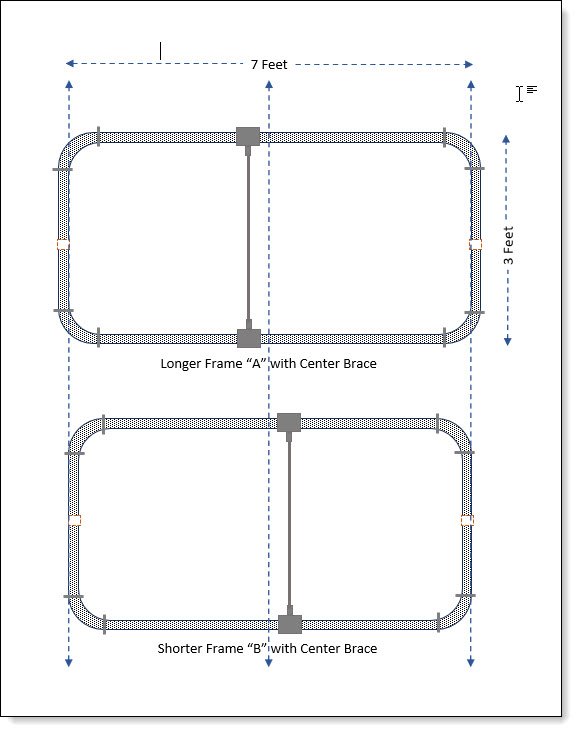
The center braces are 1″ Schedule 40 PVC pipe. I could have used 1-1/2″ PVC for the braces, but I liked the slimmer 1″ look. Plus, I happened to find 1-1/2″ to 1 “T”-adapters while I was shopping and thought they looked cool.
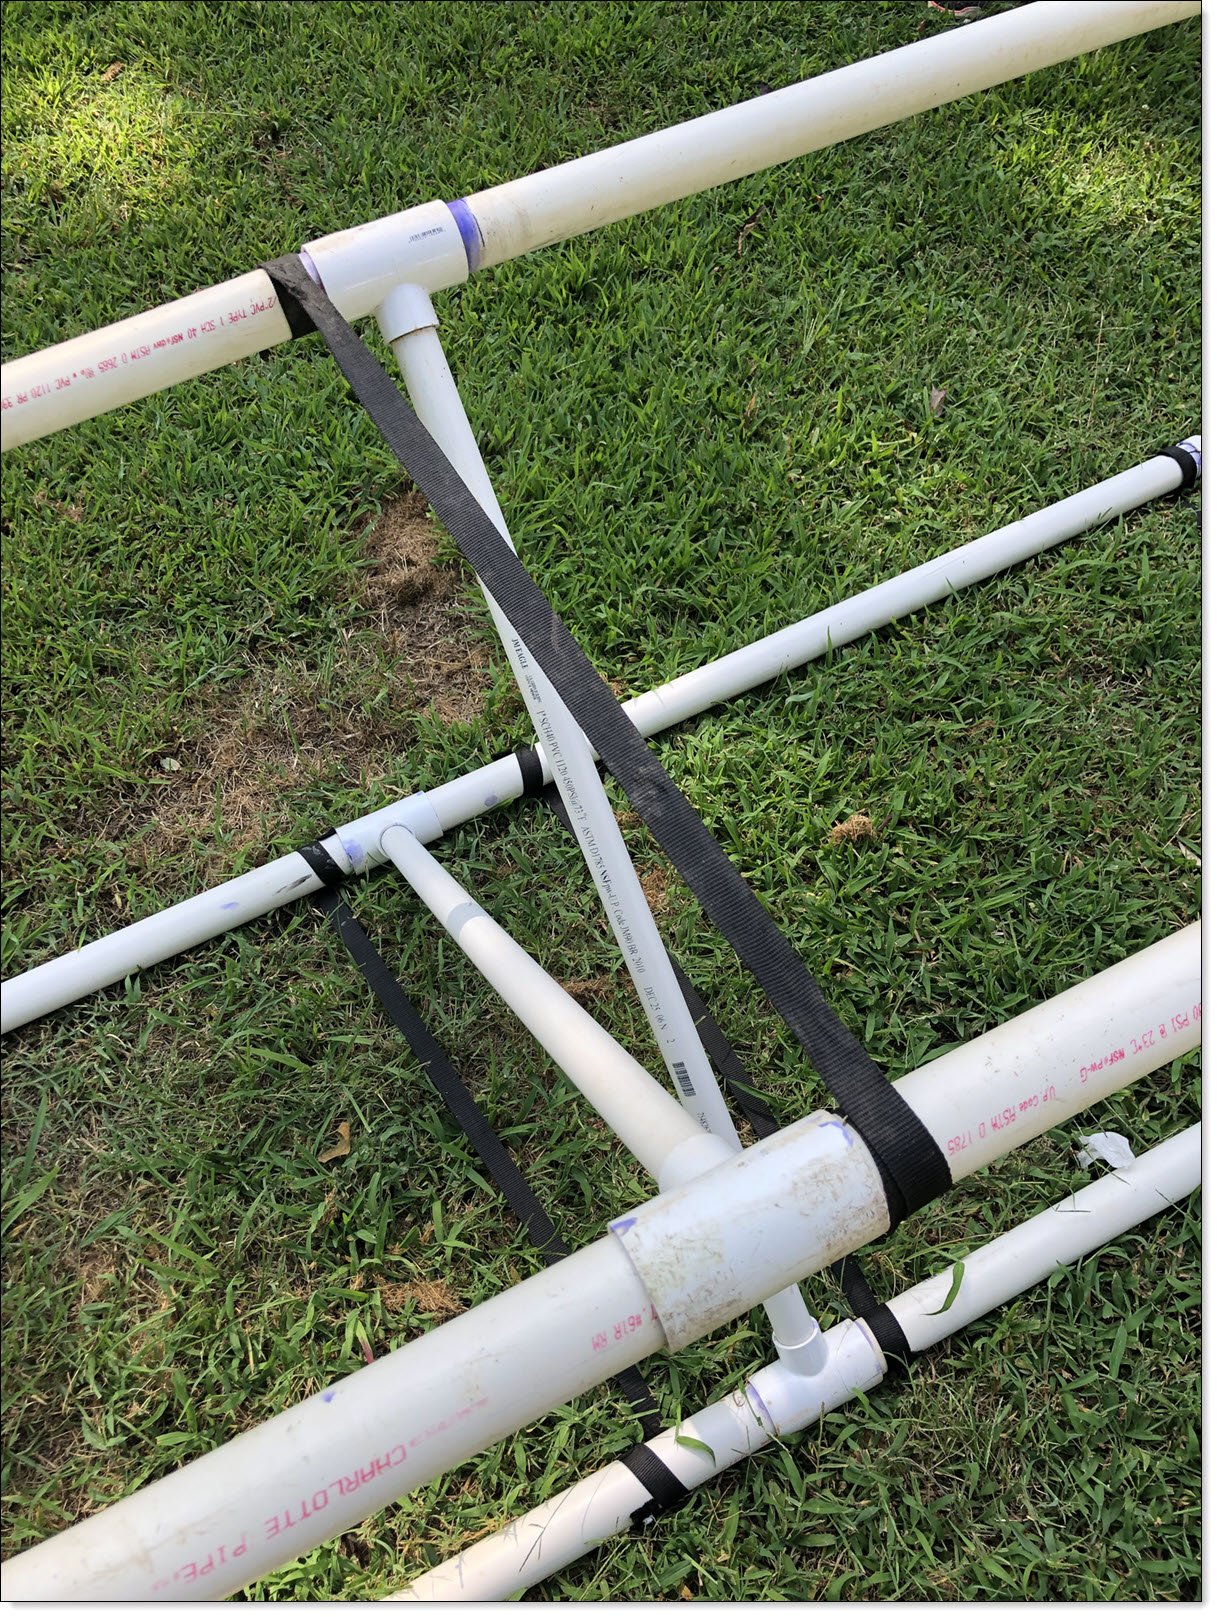
The only tricky part of construction is to interlace the center braces through the inner and outer frame.
Pivot Bolts
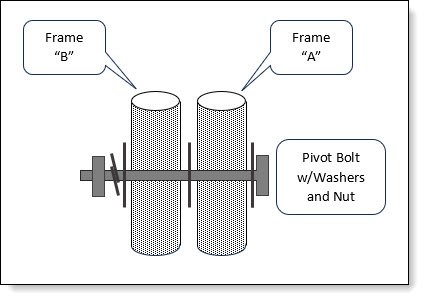
I used two 3/8″ x 5″ galvanized bolts with galvanized nuts and washers to hold the frames together. This creates pivot points so the two frames will fold together when not in use. Larger bolts would also work, but I would not recommend using anything smaller. These bolts support the weight of the stand and kayak, so need to be strong.

Nylon Straps
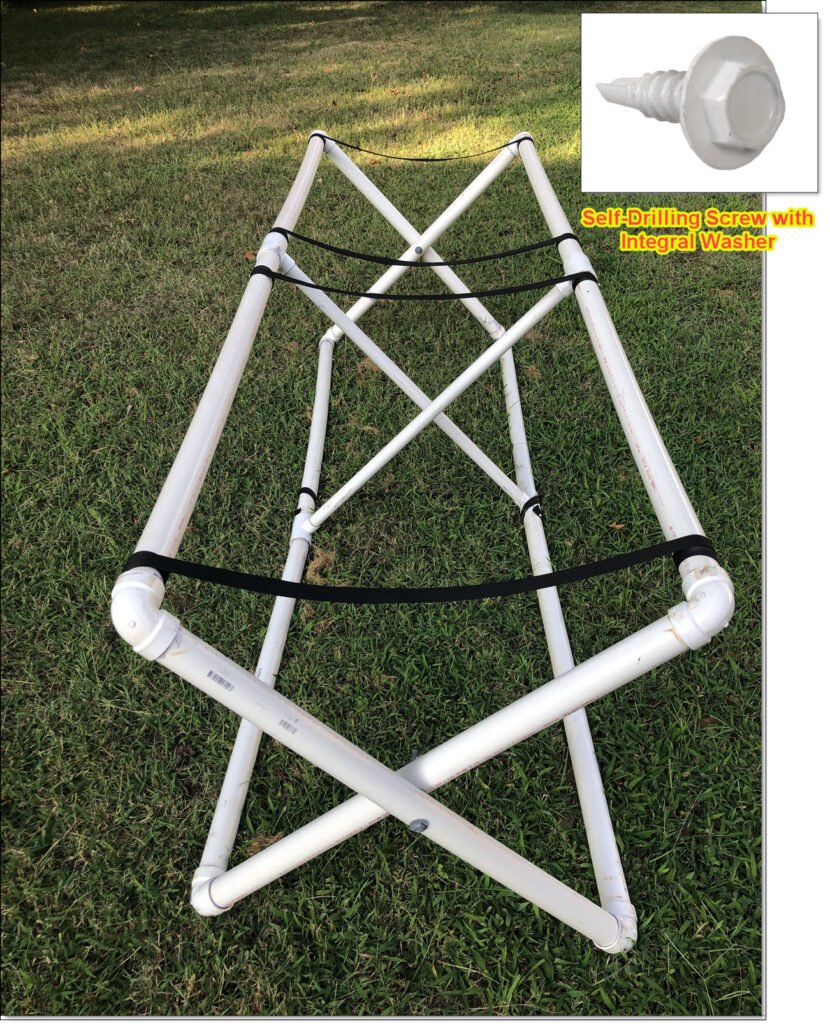
I used one-inch-wide nylon strapping to connect the two frames and create support for the kayak. The length of the straps determines the width of the open stand, and the top straps provide the support for your kayak. After some trial-and-error, I settled on four upper straps and one on the bottom. The top straps, one at each end and two in the middle, work well to support all my kayaks. They’re attached to the PVC using self-drilling hex-head screws with integral washers.
The bottom strap is important to maintain the working stand’s width. I discovered that the top straps would sag under weight of a kayak, which messes with the stand’s height. As the width changes, the height changes. So, the lower strap sets the maximum width the stand can open.
Wrapping the strap around the PVC adds strength. If you were to just screw in the ends of the straps and pull across to the opposite side, you could quickly tear out the strap. By wrapping it around the pipe at least once, as you put tension on the strap it jams the inner level of strapping tighter against the PVC.

Instructions
In addition to the instructions and parts list shown below, I’ve also created a downloadable set of instructions. These instructions are freely distributed under a Creative Commons (BY-NC) license.
Downloadable Instructions![]()
Tools
- Small hand saw. A back saw with miter box is best.
- Sandpaper, 220 grit or finer.
- Electric drill with 3/8″ diameter drill bit.
- Two wrenches, used for the 3/8″ bolts and nuts.
- Tape measure.
- Screwdriver with hex socket for the self-drilling screws. An electric screwdriver is best.
Materials
- Four: Ten-foot lengths of 1-1/2″ PVC Schedule 40 Pipe
- One: Ten-Foot Length of 1″ PVC Schedule 40 Pipe
- Eight: 1-1/2″ PVC Schedule 40 90 Degree Pipe Elbows
- Four: 1-1/2″ to 1″ PVC Schedule 40 “T” Connectors
- Seventeen feet: One-inch-wide nylon strapping (minimum length needed)
- Ten: Self-Drilling Hex Head Screws w/Washer, #8 x 9/16″
- Two: 3/8-in x 5-in Galvanized Coarse Thread Hex Bolts
- Two: 3/8-in x 16 Galvanized Steel Hex Nuts
- Two: 3/8″ Galvanized Standard Split Washers
- Six: 3/8″ Galvanized Standard Flat Washers
- One: Kit of PVC Cement and Primer.
Assembly
This project should take about: 2 hours
Building an Inflatable Kayak Work Stand of PVC Piping
- Creating the Short Pipe Sections
– Cut the ten-foot lengths of 1-1/2″ pipe into seven-foot / three-foot lengths. Be sure to clean the cut ends with sandpaper so they’ll fit into the PVC elbows.
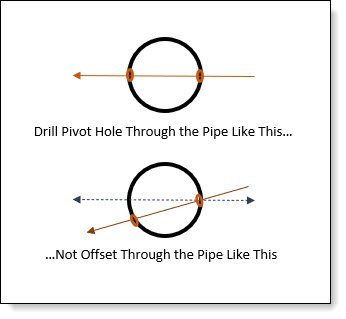
– Using a 3/8″ drill bit, carefully drill matching holes in the center of each piece of three-foot pipe. These holes will be used for the pivot bolts, so it’s important to drill these holes through the middle of the pipe.
- Gluing up Frame “A”
– Take two seven-foot lengths of pipe, two of the three-foot sections previously drilled, and four 1-1/2″ PVC elbows.
– Glue these pieces together using the PVC primer and cement. Be careful to align the short side pieces so the center pivot holes are aligned with each other.
– We’ll be cutting this frame to insert the center brace later.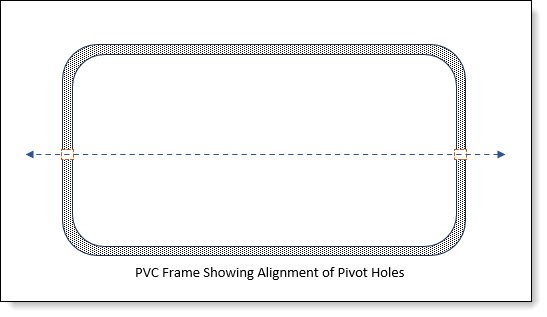
- Gluing up Frame “B”
– Take the two remaining seven-foot lengths of PVC pipe and cut three inches off one end of each pipe. Be sure to clean the cut ends with sandpaper so they’ll fit into the PVC elbows.
– Take the two remaining three-foot pieces of drilled pipe, and four 1-1/2″ elbows. Glue up the frame, again being sure that the center pivot holes are aligned with each other. - Inserting the Center Braces
– The center braces are offset and interlaced into the frames. You will add the brace to short Frame “B” first, then to the longer Frame “A”.
- Inserting Center Brace into Frame “B”
– Cut the ten-foot piece of 1″ PVC pipe into two three-foot sections. Be sure to clean the cut ends with sandpaper so they’ll fit into the PVC “T” section.
– On Frame “B,” along both long spans, measure 44″ from the left end of the PVC Pipe (where it terminates inside the elbow).
– Cut the PVC pipe at this measurement. Be sure to clean the cut ends with sandpaper so they’ll fit into the PVC “T” sections.
– Glue the 1-1/2″ – 1″ “T” fittings into one section of the frame. Be sure to keep the 1″ ends aligned with each other, so the 1″ PVC pipe will fit.
– Now glue one piece of 1″ PVC into the open “T” ends. You’ll need to spread the 1-1/2″ PVC slightly to fit.
– Once you’ve fitted the 1″ PVC section into the “T” section, glue the other frame half into the open “T” fittings.
– This completes assembly of Frame “B”. - Inserting Center Brace into Frame “A”
– You will be using the other three-foot piece of 1″ PVC pipe.
– On Frame “A,” along both long spans, measure 41″ from the left end of the PVC Pipe (where it terminates inside the elbow).
– Cut the PVC pipe at this measurement. Be sure to clean the cut ends with sandpaper so they’ll fit into the PVC “T” sections.
– Glue the 1-1/2″ – 1″ “T” fittings into one section of the frame. Be sure to keep the 1″ ends aligned with each other, so the 1″ PVC pipe will fit.
** Now Comes the tricky part. **
– Glue one end of the 1″ PVC brace into the top open “T” fitting.
– Place this section on top of the completed frame “B”, so the left sides align. Slide Frame “A” down so the bottom overhangs Frame “B”.
– Slide the bottom end of the center brace under Frame “B”, then glue into the Frame “A” “T” fitting.
– Once you’ve fitted the 1″ PVC section into the “T” section, glue the other frame half into the open “T” fittings.
– At this point, the two frames will be interlaced. - Installing the Pivot Bolts
– Align the two Frames so the pivot holes at each end align.
– Put a flat washer on one of the pivot bolts so it’s pushed up against the bolt head.
– Insert the bolt through the longer Frame “A” hole.
– Slide a flat washer over the bolt between Frame “A” and Frame “B”.
– Push the bolt all the way through the pivot hole of Frame “B”. Slip on another flat washer, then a lock washer, then a nut.
– Repeat on the pivot hole on opposite side of the workstation.
– Tighten the nuts on both pivot bolts until snug. You want to leave them just loose enough so the two frames can pivot freely. - Measure and Cut Nylon Straps
– The width (and height) of your work stand depends upon the length of the nylon straps. You want your work stand to be wide enough so you kayak(s) will fit between the PVC piping. If the kayaks sit on top, they’ll tend to slide off the stand while you’re attempting to do stuff to them. Note that the wider you make your stand, the lower to the ground it will end up.
– – I set my width at 27″ inches, which is probably a good size for most recreational kayaks. At this width, the stand height is about 27″ which is great for me. A little wider might be better, but then the boat will sit lower to the ground.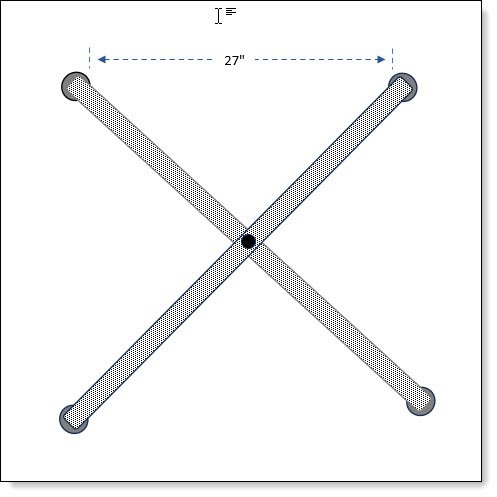
– Whatever width you choose; you’ll need to add at least an extra 12″ length to the nylon straps to allow for wrapping them around both sides of the frames.
– Once you’ve determined the length, cut your one-inch-wide nylon strapping into five equal lengths. Be sure to heat-seal the cut edges so they don’t unravel. - Attach Top Nylon Straps
– On the top pipes, mark four points on the outside of the PVC, aligned across each frame. I placed straps at the junction of the 1-1/2″ elbows at end, and two in the middle just past the “T” fittings of the center braces. This seems to work out well and provides adequate support for my kayaks.
– Place one end of a nylon strap against the PVC pipe and run a self-drilling screw through the strap and pipe until the screw is snug.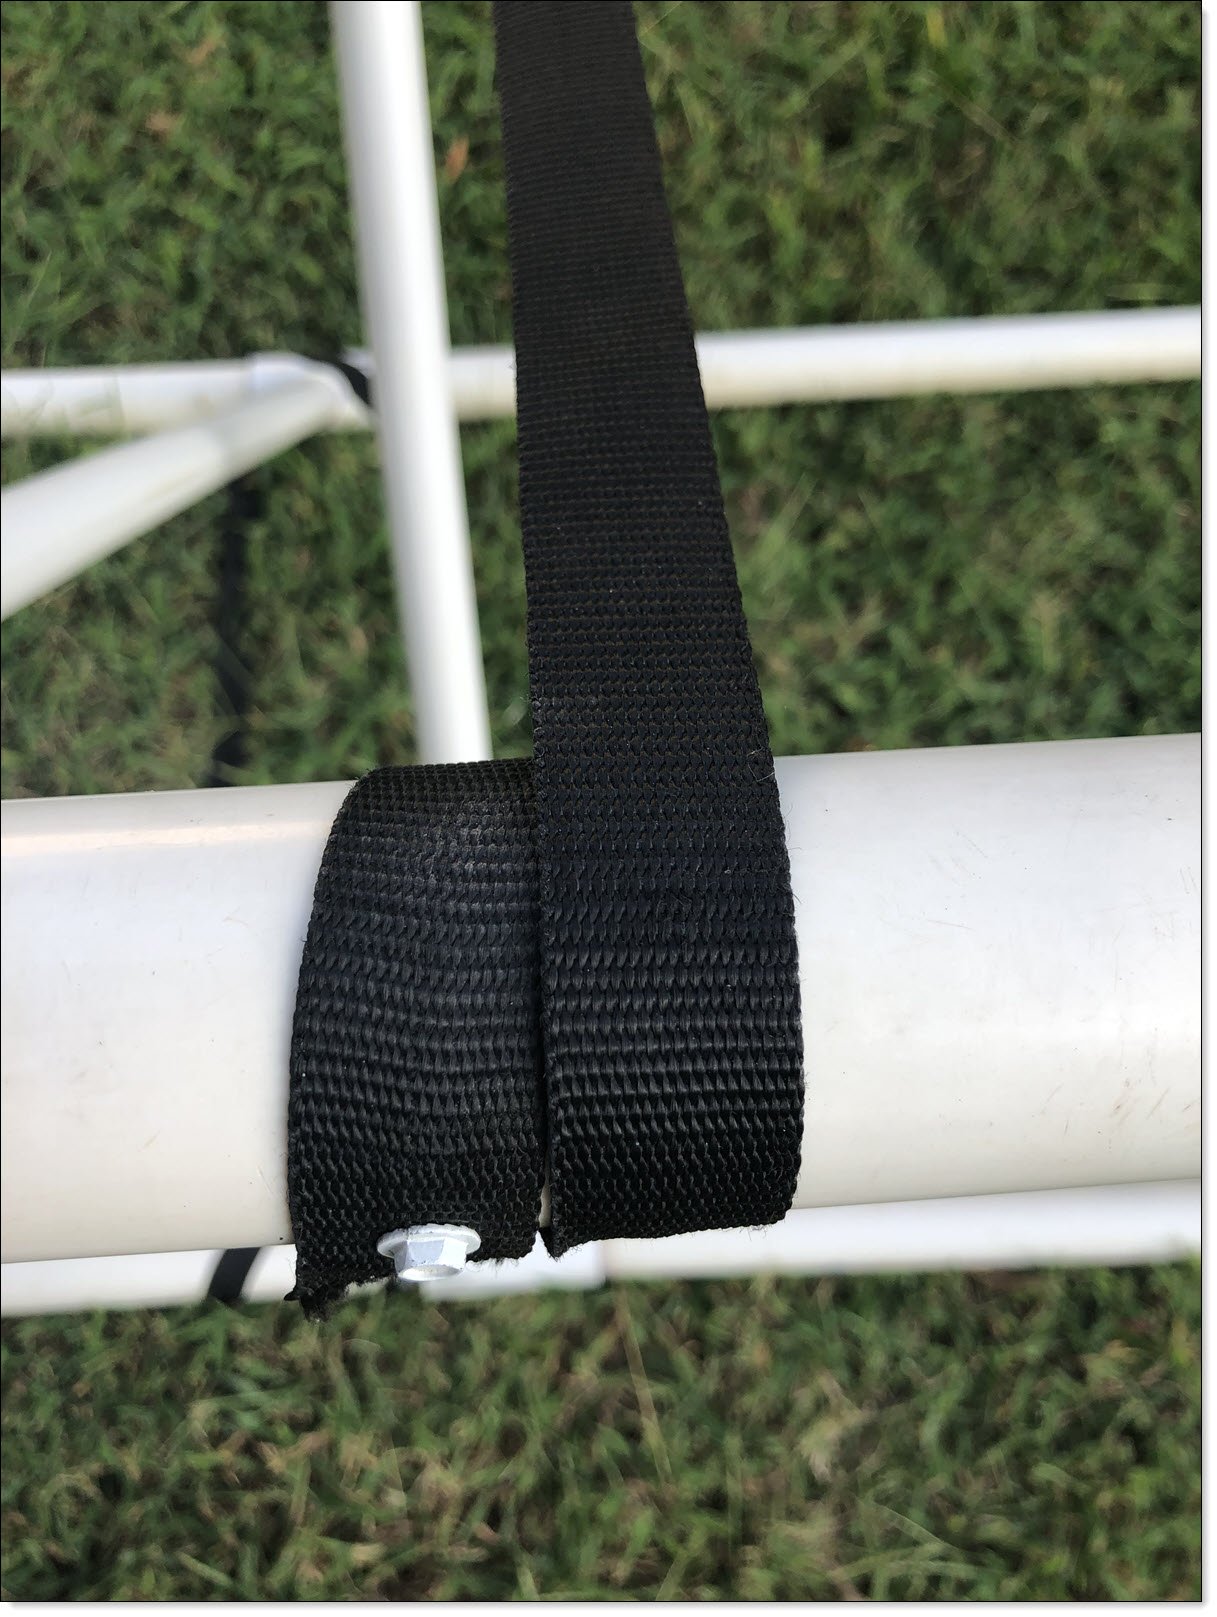
– Wrap the strap around the pipe once, then run it across to the opposite side of the stand.
– Keep the two frames close together so there is adequate slack in the strap. Wrap the strap around the pipe once, starting at the top, and finish with the end of the strap over your location mark.
– Run a self-drilling screw through the strap and pipe until the screw is snug.
Repeat with the remaining three straps. - Attach Bottom Nylon Strap
– Turn the work stand upside down. Mark mounting locations for the single bottom strap. I mounted mine in the space between the two center support brace “T” fittings.
– Attach this strap the same way you attached the upper straps.
– Turn the frame right side up, and you’re done!
Your kayak work stand is finished!
Related Posts
- Boating Hacks: Kayak Light Mast
- Boating Hacks: Sea Eagle Skeg Guard
- Boating Hacks: Sea Eagle Inflatable Kayaks
- Review: HO Sports beacon Inflatable Kayak
- Review: Sea Eagle 370 Inflatable Kayak
- Kayaking Adventures
Edited: April 13, 2025, to add some minor clarity to the instructions.