My writing has been light lately, and there’s actually a good reason for this; a better reason that just not feeling like writing. I finally finished rebuilding my boat “Sea Dreams” enough that I could get her back in the water, and that event has pretty much taken first priority.
I’ve mentioned in a few previous posts that I was performing a massive rebuilding project on “Sea Dreams.” Well, in the great scale of shipbuilding projects, it’s only an 18 foot outboard run-a-bout. In my scale of projects that have actually been completed, it’s massive.
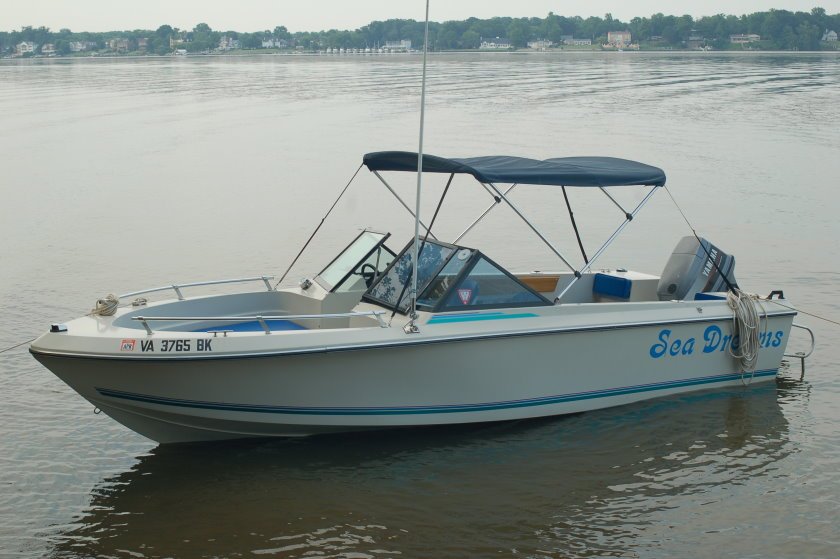
I purchased “Sea Dreams” in October 2002, after my divorce, when I decided it was time for my own boat. I purchased her from a private party who was at least second owner. At the time I purchased her, the deck was already soft in one spot, but I didn’t think too much of it. I really didn’t know much about boats other than this boat was pretty much what I was looking for both in price and features. This was an 18 foot “walk-thru” (open bow, bow rider) style outboard, a Regal “Countess 180” 1975 vintage with re-powered 1989 Yamaha 90HP 2 stroke and a replacement 1999 trailer.
Over the next several years I had my share of fun and frustrations with “Sea Dreams,” pretty typical for any boat owner. Overall, I loved being in the boat exploring the Mississippi waterways. When we moved up here, there was no question or even discussion about bringing her – that was a given.
Over the years of owning her, I also learned a lot about boat maintenance. Among other things, I learned that the soft spot in the deck meant the deck was rotting out and at some point would need to be replaced (if I wanted to keep the boat). The soft spot kept expanding, and by last season I could tell the performance was degrading. I decided that this winter and spring I would take the plunge and replace the deck, a commitment to keeping “Sea Dreams“.
Seeing as how I would be working in an un-covered driveway, I wanted to start in early September. Then remodeling the basement bath took precedence, so I didn’t actually start my boat project until early November. On November 4, 2007, I proceeded to rip out the existing deck and assess just what I would need to do.
That assesment didn’t take too long – about one afternoon. The deck was so rotten in places I could rip out 1/8″ fiberglass and 1/2″ plywood with my bare hands. Once getting through the deck, I could see the buoyancy foam was saturated with water in places, and in some places the stringers were as rotted as the deck. It was what I expected, but hoped would not be the case.
The weather got too cold to work shortly afterward, so I kept the boat gutted and covered over for the winter. Whenever I had a reasonably warm weekend day over the next several months I would do some additional prep work. Starting in late January I put sheet plastic under the canvas cover and kept a small heater running inside, helping everything to dry out. I also spent the winter researching materials and techniques I would need and purchased stuff a little at a time. I had to wait until the temperature got into the high 60s/low 70s to do the fiberglass work.
I also performed a few other projects over the winter that were needed including new upholstery and having the prop reworked.
Finally, on April 4, I started rebuilding. By now, the boat was completely gutted inside, dry, prepped for rebuilding. Over the next several weeks I replaced the stingers with a pourable composite that was strong, but extremely messy. I replaced the old “florist” buoyancy foam with a two-part pourable polyurethane foam that was extremely cool. The stuff had an expansion ratio that was just awesome to watch – way more exciting than watching paint dry. You really had to be there. After that, I was able to lay down the new deck.
I used 1/2″ plywood for the new deck, coated on the bottom side with one layer of 10 oz fiberglass cloth. I screwed and glued (using construction adhesive) the sheets down then coated the topside with two layers of 10 oz cloth, reinforced with 8 and 12 oz fiberglass tape on the seams, then a layer of 1 oz matting with white tinting added to the polyester.
I had to rip out most of the wiring as part of removing the deck, so I decided it was a good excuse to replace wiring and route all cables properly. After the deck, it took two more weeks to do the wiring and routing of control cables, which included installing a new switch/fuse panel with voltmeter that I had built over the winter. I also installed new wood trim panels on the inside and patched a lot of old unneeded drill holes.
Once the wiring was complete, I finished off the deck using a white-colored textured polyurethane coating called “Durabak,” advertised as a tough deck coating that would also add waterproofing to the fiberglass. In the bilge areas (rear drain pocket and inside the bow seating compartment) I used an Interlux product called “VC Tar 2,” a two part sealant that was advertised as tough and designed to seal fiberglass. Once the deck was coated, I re-mounted the seats and new battery boxes, then just started loading in all the accessories and “stuff.”
Along the way, I gained the attention of several neighbors, impressed with what I was doing. Winnie grew more enthusiastic with my project as I progressed, and helped in several key steps such as laying down the new deck.
Last Saturday, June 21, 2008, was sea trials. I brought the boat down to Leesylvania State Park where I normally launched last summer. While in line to use the boat launch, the Coast Guard Auxiliaries showed up to do “voluntary” boat safety inspections. I agreed to have “Sea Dreams” inspected, and actually passed with only one discrepancy – no capacity plate, which a previous owner removed. No problem otherwise. This was the first safety inspection I’d ever had performed, and I was issued my first ever safety sticker.
Once finally in the water, “Sea Dreams” handled beautifully. I could tell the difference right away in handling. I ended up spending the day out on the water, cruising and anchored off a sheltered beach I discovered last summer. I actually brought some tools and materials with me and worked on additional small projects sitting at anchor.
I took the boat out again yesterday for some more cruising, water fun, and just enjoyed being on the water. It was a well-earned reward for the weeks of hard work I put into repairing the boat.
There’s still a lot of small projects I want to do, many of which will wait until this coming winter and early spring. But the boat is looking good, is running good and feels more solid that ever since owning her, and the big part of my project is finished.
I have to admit, I feel really good actually completing this project. I’m looking forward to many boat outings this summer, and many more years of cruising in “Sea Dreams.”
Note: I plan on a feature-length story about this project, including extended details of the reconstruction and dreaded “lessons learned” along the way.
Related Posts
Boatless! : On selling my boat Sea Dreams after a long run of fun and repair work.
Sea Dreams : My photo gallery of Sea Dreams, and the many adventures with her.
Craig’s List Ad – Selling Sea Dreams: My classic Craigslist ad for selling Sea Dreams.