The Kitchen
Meanwhile, I was pulling out the vinyl flooring in the kitchen. I moved the refrigerator to do this and discovered the water hose connection to the icemaker had been leaking. The top layer of plywood flooring was badly rotten. I scraped that out and discovered the subflooring was damp but otherwise solid, a big relief. But this meant I would need to replace the top layer of plywood before laying down new flooring.
I also had to move out the stove and dishwasher. In process of moving out the dishwasher the sink cabinet collapsed from rot. With the sink cabinet gone I discovered black mold on the drywall, meaning the drywall had to be removed. Which meant pulling out all the cabinets. So, suddenly, the kitchen was stripped down to the framing and subflooring, something I had not planned to do when we started this project.
We did have a bit of excitement pulling out the drywall behind the kitchen sink. As we removed it, a knee-high stack of single and double-edge razor blades spilled out from the wall cavity. After a few moments of shock, I went into the bathroom which shared the kitchen wall. I opened the original 1950s medicine cabinet and, in the back, saw an open slot labeled “Razor Blade Disposal.” Winnie asked the question “What did they expect to do when the wall filled up?” We carefully bagged up the fifty-some years accumulation of razor blades and got them out of the house.
The surviving kitchen cabinets were greasy and ugly as hell but looked pretty solid. I was good with cleaning them up and putting them back in. Winnie had other ideas.
The Design Phase
Over the next couple of weeks, we had lively debates over how to rebuild the kitchen. We finally settled on a design Winnie could live with, and that I could build.
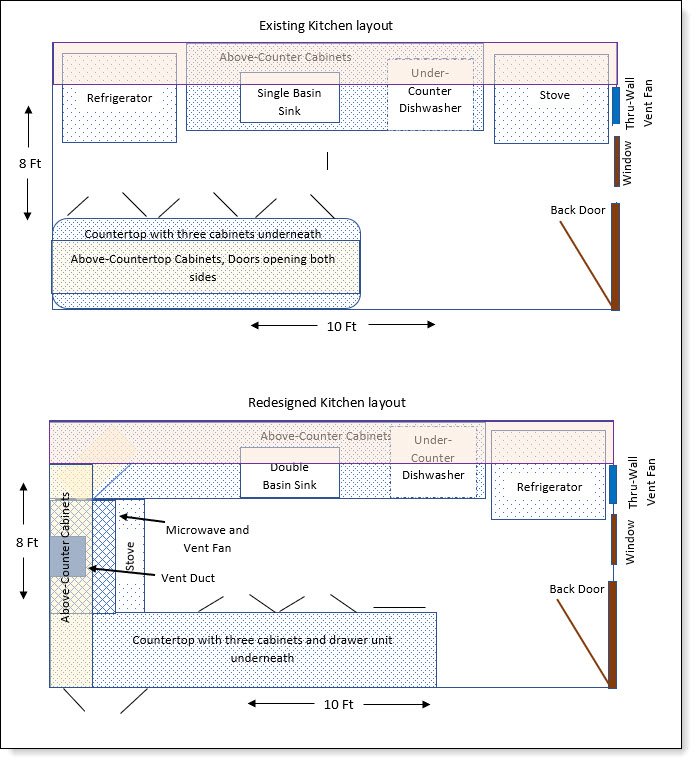
Since we already had all the drywall ripped out, it made it easier for us to add new wiring. I’m a big believer that a kitchen never has enough power, and the existing kitchen had – one countertop outlet. As part of the redesign, I made sure to add several new twenty-amp GFI outlets along the walls. I added power for the new microwave, and wiring for a garbage disposal (which the existing kitchen lacked). The electric stove and refrigerator outlets were relocated.
Along with wiring, I added area lighting above the sink as it was facing a blank wall. There was a large ceiling-mounted cabinet over the peninsular countertop, hanging just low enough to be annoying. Pulling it out left a frame on the ceiling. Instead of ripping the frame out and rebuilding the ceiling, I used the frame as a mount for area lighting over the planned new counter. Since the kitchen shared a wall with the bathroom, I was also able to add an outlet in the bathroom which it previously lacked.
Having the basement gutted out was also a big plus in running new wiring.
To save money we purchased unfinished cabinetry. While I reworked all the wiring, Winnie kept busy varnishing these new cabinets. We salvaged all the old cabinets (except for the sink cabinet) and hauled them home to our garage. (We later refinished and used them for my garage workshop.)
Once the wiring was in, I replaced the plywood flooring laid over subfloor. This second layer of wood raised the kitchen floor to the same level as the adjoining oak flooring in the dining room, and acted as a base for the finished floor. The extra thickness also added strength to the flooring, needed to support the weight of appliances and cabinetry.
Going Back In
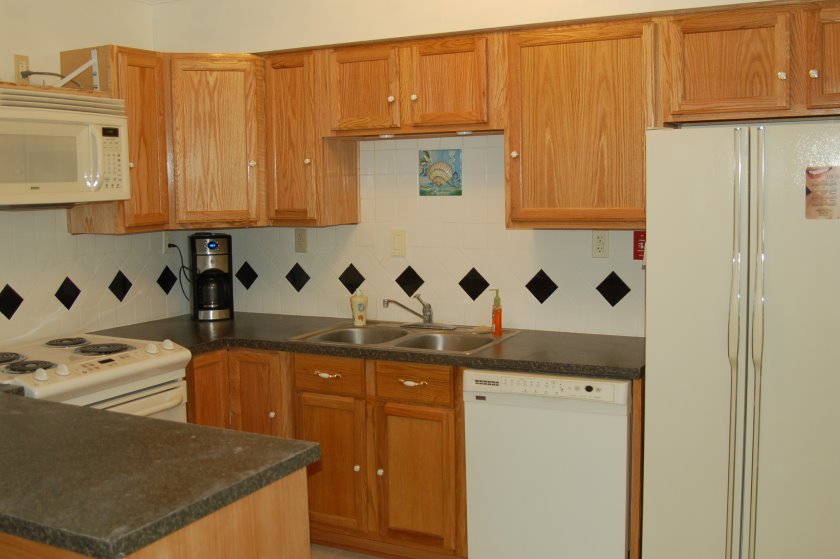
By Thanksgiving weekend we were re-hanging drywall in the kitchen. I already had the cabinet layout marked on the plywood floor, and as soon as the drywall was up the cabinets went in. The existing stove was junk, so we treated it accordingly and Winnie purchased a new slide-in electric stove. We re-used the existing refrigerator, after I replaced the leaking ice-maker valve. We also purchased and installed a new dishwasher, over-counter microwave, garbage disposal, and new double-basin stainless steel sink. The sink basin was a little wider than the sink-base cabinet, requiring some creative cabinetry work.

The new microwave doubled as stove vent and we wanted it to vent outside. This meant running a new duct up through the ceiling and out the roof, but it was already too cold to be working outside. So, I deferred this part until warmer weather. The 1950s wall vent still worked, but the motor and fan blades were coated with over one-inch thick layer of grease. I spent most of one Saturday, while Winnie was at work, taking it apart and cleaning it. Just because I thought having an old wall vent was really cool.
Finally, it was time to install the new countertop. We took the cheapest way out by buying three-quarter-inch plywood, cutting it to size, and mounting it on the new cabinets. Then I spent a weekend cutting and gluing down Formica. It was the first time I installed Formica and I don’t mind saying it came out looking like a professional job.
By now we were approaching Christmas, and the kitchen was about finished. The last bit Winnie tackled was installing a tile backsplash on the two inside kitchen walls. She proved to be very adept with tile, and her work gave the new kitchen a nice, finished look. The best part was we could now prepare meals in the house while we worked.