
Estimated reading time: 22 minutes
Boats have a reputation for being expensive. However, this is not completely true. Boats are very inexpensive to maintain and operate, as long as you don’t put them into the water. Once a boat gets wet, all bets are off and “boat” does in fact become the acronym “Bust Out Another Thousand.”
A few years ago, I made a horrifying discovery that water was seeping inside the wood-cored transom of our family boat “Sea Dragon.” Water and wood do not mix, and this issue required some serious remediation work. So, I’ve spent the past several years drying and waterproofing “Sea Dragon.”
The Boat
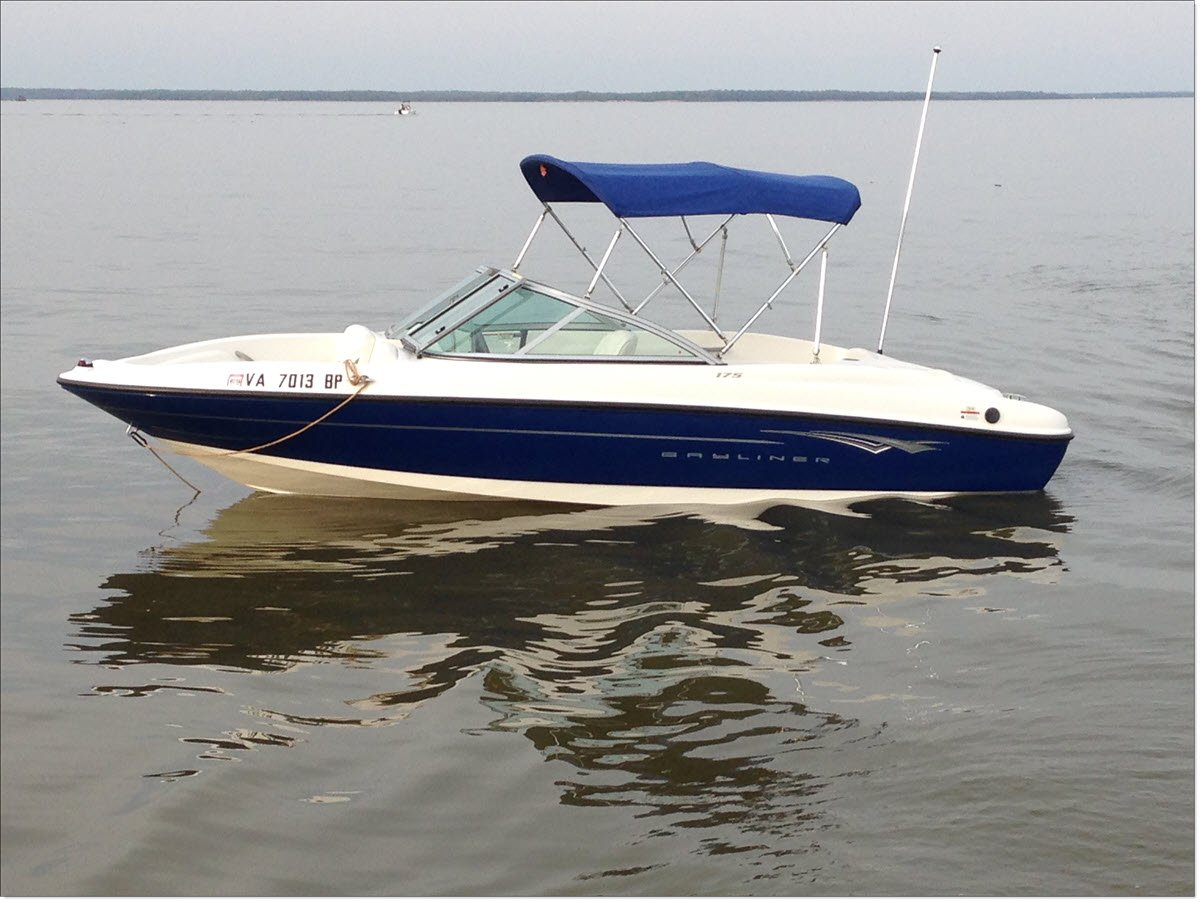
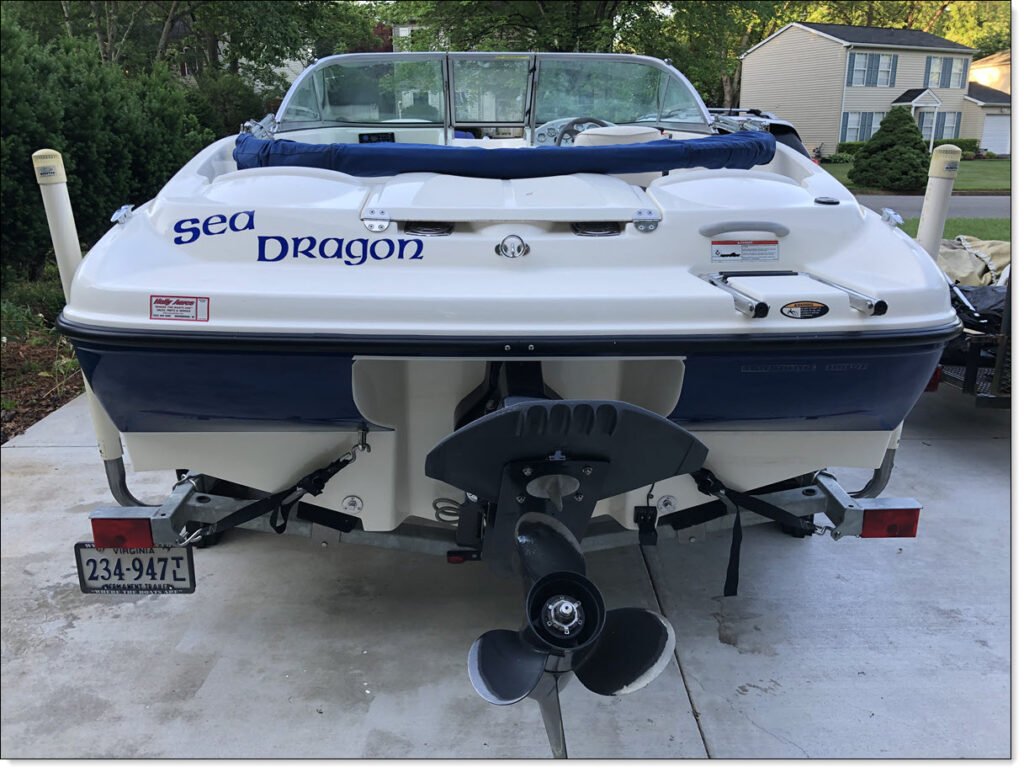
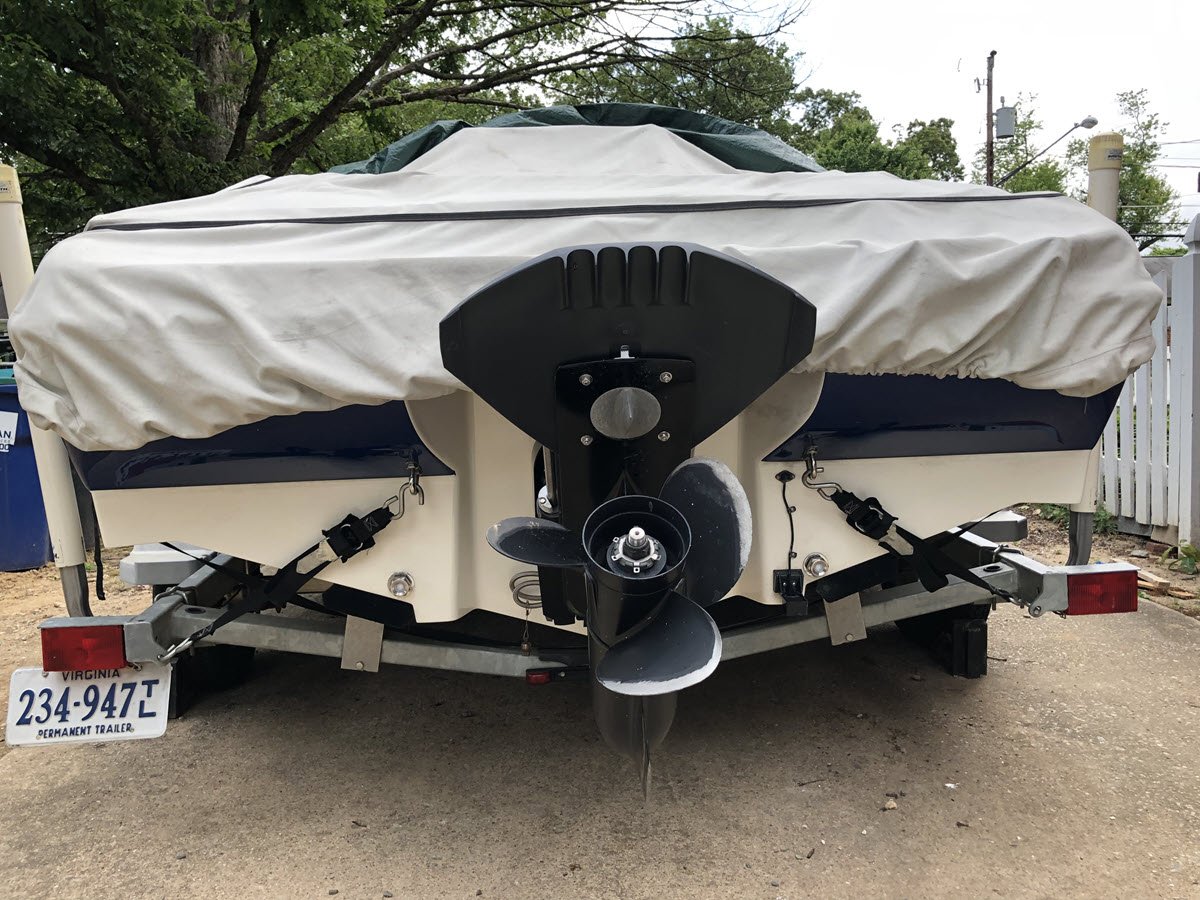
Sea Dragon is a 2010 Bayliner 175BR sterndrive runabout. Winnie and I purchased this boat new back in July 2010, a few months after I sold my first boat Sea Dreams. The longer we’ve owned this boat, the more we love it. After the excessive work I put into Sea Dreams, for the first several years of owning Sea Dragon I paid professionals to do the maintenance. Gradually, I took over more maintenance myself. Largely because I wasn’t happy with the level of care versus prices I was getting gouged charged.

Besides maintenance, I’ve been extremely careful with doing “upgrades.” Sea Dreams had been extensively “upgraded” in the years before I bought her, and I also did a lot of “upgrades.” However, most of my upgrade work was fixing the previous owners upgrades. I do not want to repeat that with Sea Dragon.
The Discovery
So, my first significant upgrade on Sea Dragon was in 2018, adding a depth finder. While drilling holes in the transom to mount the transducer I discovered, to my horror, that the wood core was soaked with water. A few drops of water actually seeped out of the lowest holes.
Water getting into the transom is a cancer for boats. Once the wood core gets wet, it starts to rot and lose strength. At some point, either the transom wood core gets replaced or the boat gets scrapped. I decided I wasn’t ready for either option.
I finished the transducer install and started planning out remedial transom-drying work.
Warranty Fail
The boat came with an alleged “Limited Lifetime Warranty” on the hull. So, I immediately contacted Bayliner about warranty work. I was directed over to my local Bayliner dealer, “Prince William Marina and Boat Sales.” After making arrangements with the repair shop, in mid-October I brought Sea Dragon in for evaluation. The repair department manager, Doug, directed me to park it in the repair yard holding lot and told me I would be contacted “soon.”
In mid-November I called to find out status and was told they would be working on my boat “very soon.” A couple of weeks later I called again and was again told “very soon.” The next day I drove by to check on my boat and discovered that due to the way the holding lot was graded, Sea Dragon was sitting bow down. The entire front of the boat was filling up with rainwater.
The repair department was already closed, so I called Prince William Marina the next day. Once again, I was told they would take care of my boat “right away.” A couple of days later I went by again, and nothing was changed. By now it was mid-December and ice was forming on the water inside my boat. I’d had enough.
The next morning, I attempted to contact Doug directly. I was told he was in a meeting and would call right back. Two hours later, with no call back, I posted my complaint on the marina’s Facebook page. Someone responded to my post within 30 minutes giving me a phone number to call. That number turned out to be the owner, and I explained my issue. He apologized and promised to fix the problem.
Not Helping
Twenty minutes later Doug called me, obviously shaken. I explained, seriously pissed off, what was going down. He fell over himself with apologies and assured me my boat would be taken care of, immediately. I drove by the shop a few hours later and saw my boat had been moved out of the lot.
Doug called me back the next afternoon. He told me my boat was ready for pick-up and would explain what he found. When I arrived, Doug again fell over himself apologizing for the delays, and for letting my boat fill up with water in his holding lot. Then he explained his evaluation. He passed a (the first one I’d ever seen) over the starboard side transom and showed me the meter registered about 25 percent moisture. Doug claimed that level was “normal” for a boat, and I had nothing to worry about. He told me his report back to Bayliner would be exactly that – no warranty claim justified.
After apologizing a few more times, he and his people helped me hook up, and I pulled Sea Dragon back to the safety of home.
Scammed
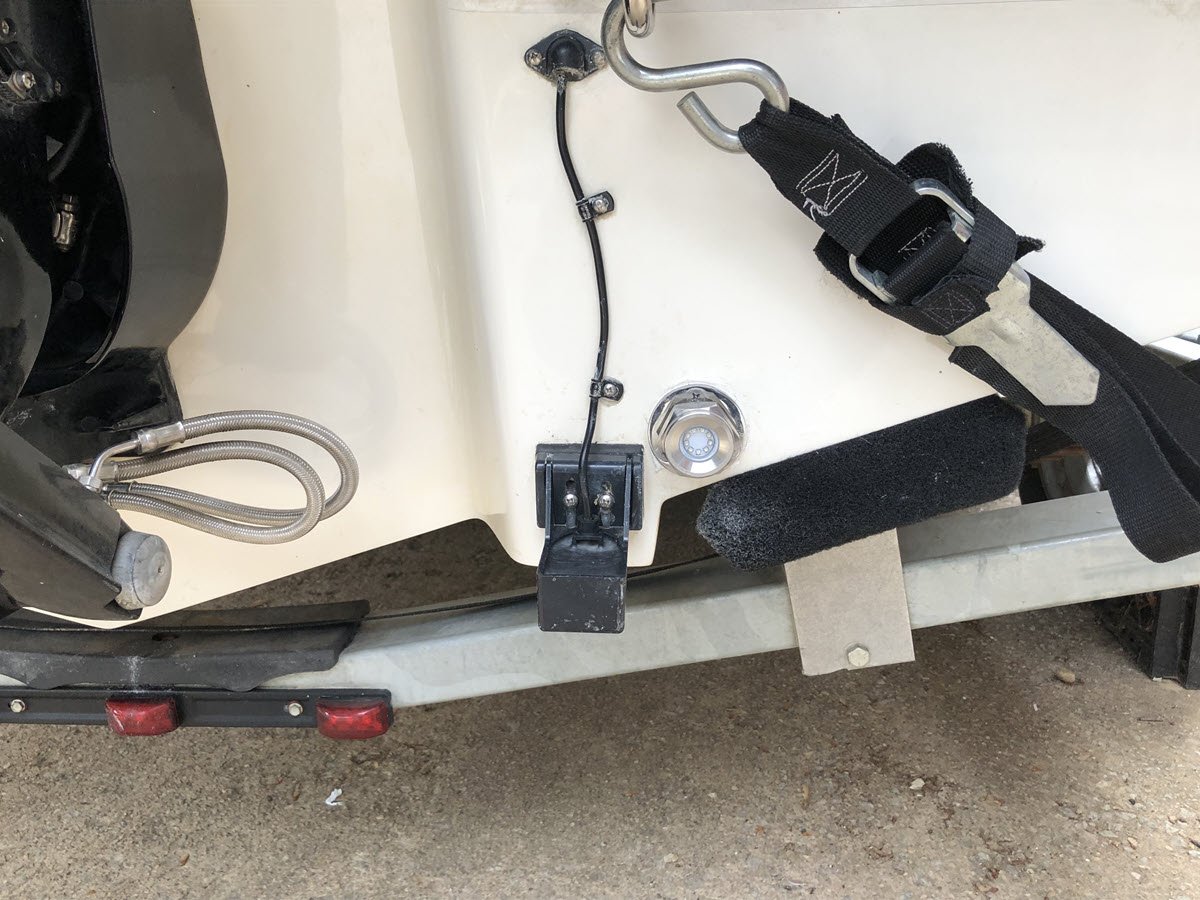
Once home, I did my own checking. I discovered that the transom had been removed while Doug had the boat, and the standard-length brass mounting screws had been replaced with longer stainless-steel screws. After removing the bilge drain plug socket, I discovered that wood core exposed by the screw holes was wet and very soft.
It was obvious the shop had removed the drain socket, seen the water-damaged wood, and used longer screws to fasten it back in place. A bit of research indicated that normal moisture levels in wood transoms should be about 10 – 15 percent, and that a pinless-style moisture meter can give highly subjective wood-core readings through a boat’s fiberglass shell.
I now had evidence that water had soaked into the transom wood core at least from the starboard side over to centerline. It was also apparent that Bayliner wasn’t going to do a Goddamn thing about honoring their warranty, so I was on my own.
In my opinion, Doug knowingly scammed me out of warranty repairs. It goes without saying; Prince William Marina has lost me as a future customer for all eternity and a few years beyond.
Home Remedy
Over the winter I researched how to repair a wet transom. I was also concerned about how the water got in the transom. I had never drilled any holes in the transom, so water should never have gotten in at all – if the boat was built correctly.
Most resources I found said to replace the transom core. But that was not an option given the cost. After a lot of research and thought, I came up with a home remedy plan.
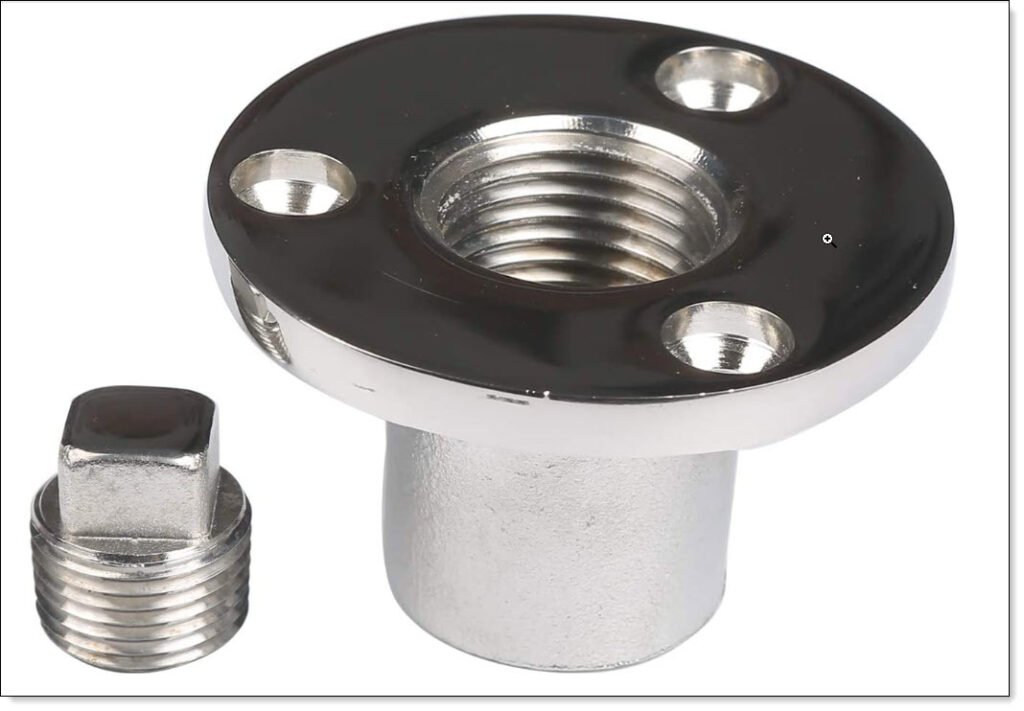
My theory was that water from a leak point and was trapped inside, sealed up with fiberglass. If the wood core was opened up, then the water would seep back out. So, I decided to drill new transom drain holes. I also knew that if I was going to make holes in the transom, I needed to be able to seal them up again, without making the boat look “patched” and ugly. Using garboard drain fittings to close off those holes seemed to be the most effective solution. As a bonus touch, I decided to use those new drain fittings as mounts for underwater lights.
I used the boat through the 2019 boating season, but knowing the transom core was water-saturated ate at me all summer long. Finally, at the end of the season, late October 2019, I was able to start repairs.
Drilling New Holes
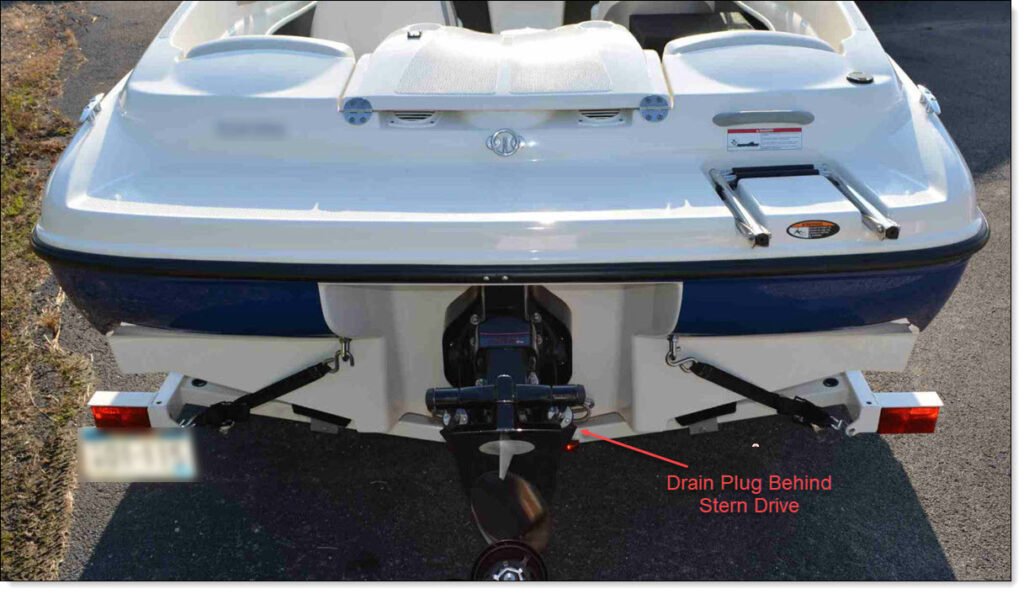
Over that season I purchased two stainless-steel garboard fittings to match drain plug-mount underwater lights. Once I put the boat up for the winter, I carefully laid out two locations for the new transom drains. On a ‘175 the transom is “split” between a port and starboard side, with a recessed pocket on centerline where the Alpha One sterndrive mounts. The bilge drain plug is mounted right on centerline, at the lowest possible point of the transom. My new plugs needed to mount as close to the low points on each side of the sterndrive pocket as possible.
The holes needed to be one inch outside diameter to accommodate the drain plug sockets. Using a provided nice sample plugs of the wood core. Sure enough, the wood plugs I removed were soaked with water on both the starboard and port sides. Given the wood around the original transom drain was also wet, I had proof the entire lower part of the transom needed drying out.


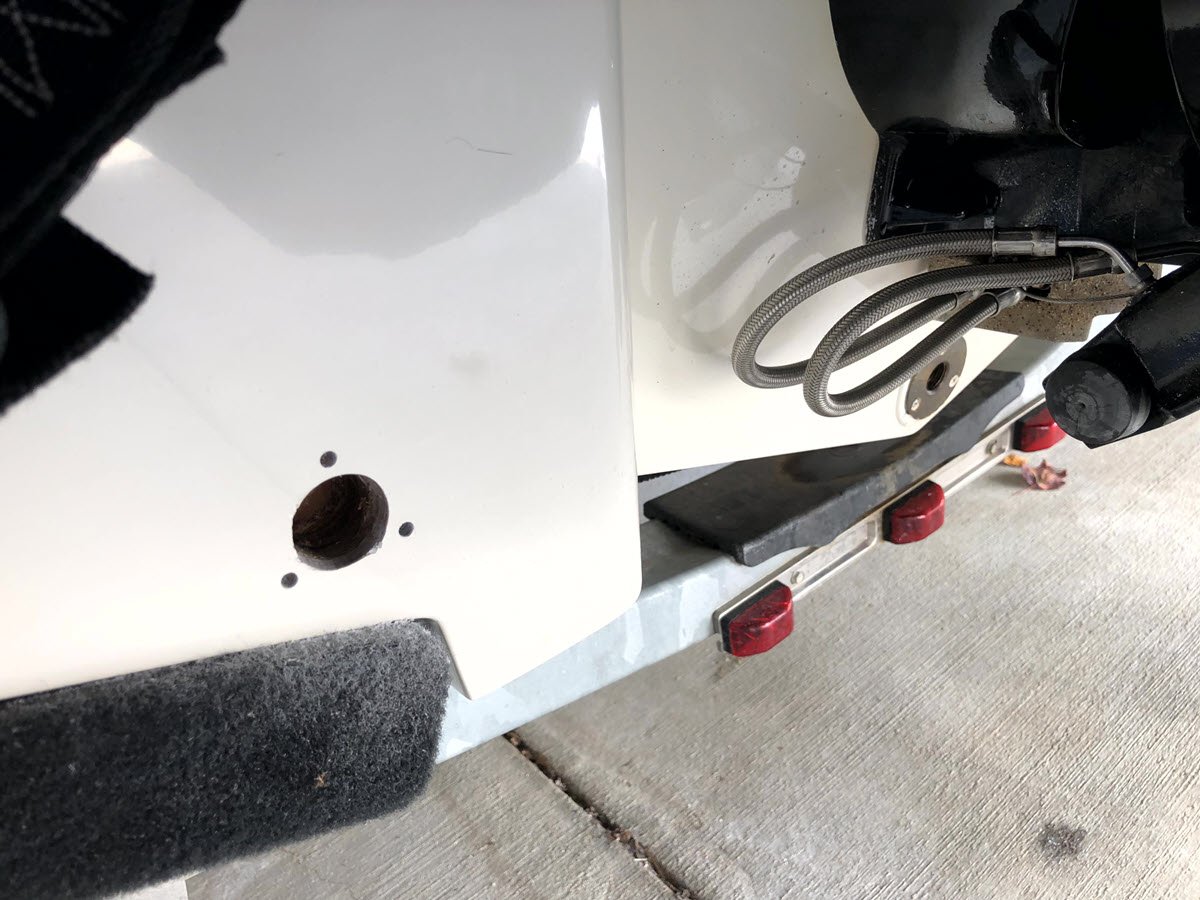
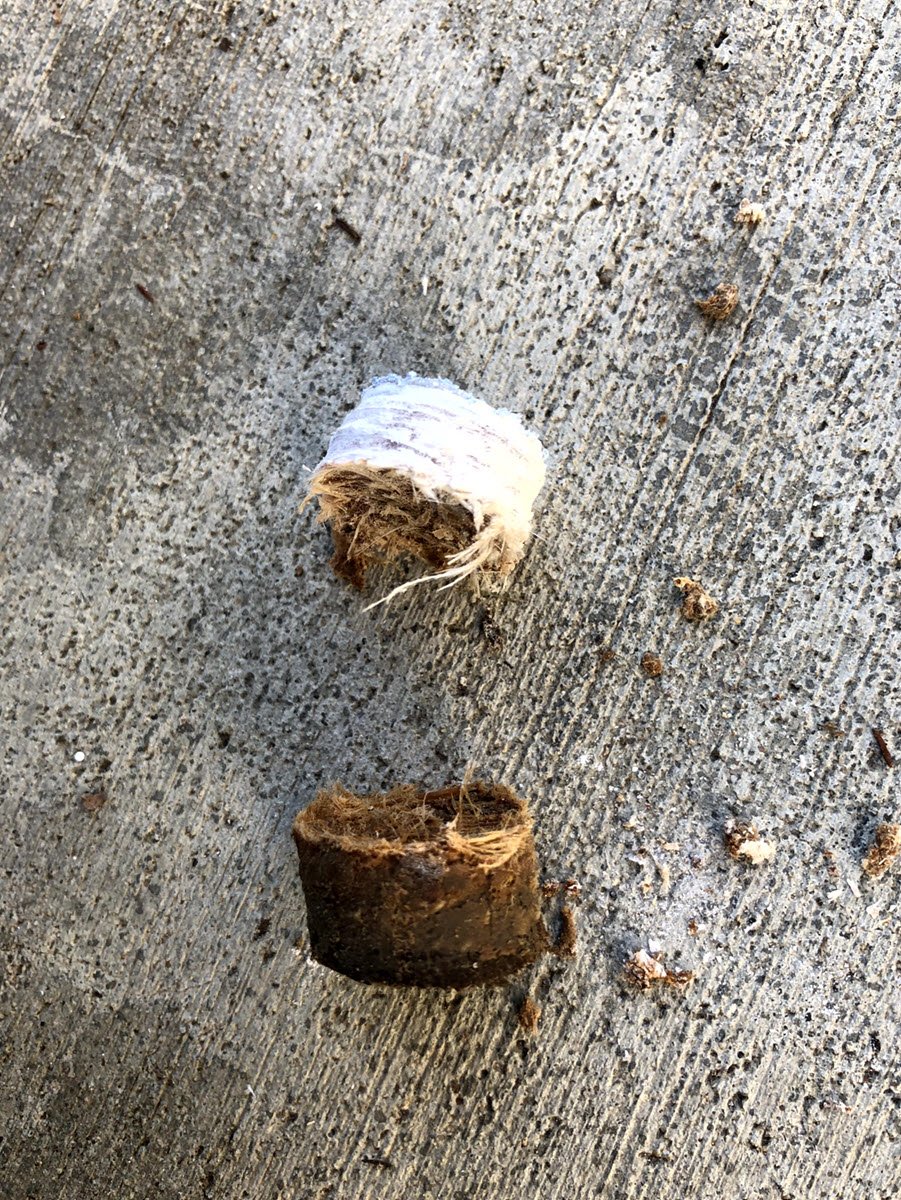
As a final test, I drilled a 3/8″ diameter hole, about one inch deep on the inside of the transom, upper-level starboard side, next to the sterndrive mounting. That test hole came out dry, indicating water was limited to the lower portion of the transom. Now I was sure I could save the transom.
Final Work
In addition to drilling the two new holes, I removed the bilge drain plug socket to expose the wood. I also removed the mounting screws for the depth finder transducer and tied off the transducer so it would not hang from the wire. I wanted those screw holes open to allow more drainage.
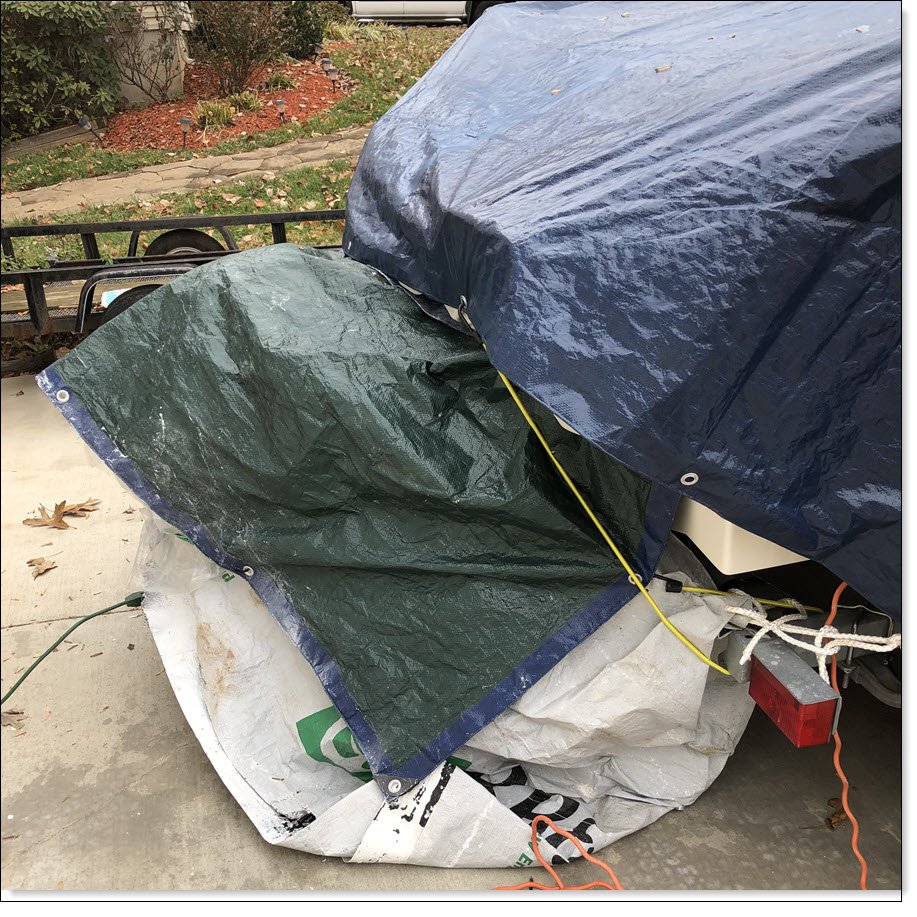
Drying Out
I expected to need several months to dry out the transom so I prepared accordingly. First, I set up three five-watt heaters, each one aimed at a transom hole. I tented the entire stern of the boat, including the underside, to create a rain-proof enclosure. Then I plugged in the heaters and just let them run.
My plan was to create a pocket of warm dry air around the transom to pull moisture out of the wood. I didn’t know how long it would take to completely dry out all the wood, but I hoped by beginning of the next boating season, starting in April 2020. Fate worked in my favor.
In March 2020 the entire world shut down due to the COVID-19 pandemic. Winnie and I ended up going nowhere and doing nothing outside of the house, except for local walks, for all of 2020. That kept my transom-drying rig going for one year longer than first planned. I ended up needing all of that extra time.
Periodic Checkups
Every few months I’d turn off the heaters for a few days, then check moisture of the holes. What I expected was that the wood was drying out where it was exposed in the holes. With no drying heat applied, any remaining moisture would move back to the exposed surface. Sure enough, the wood continued showing moisture in all three transom holes. After my check, I’d turn the heaters back on again, reset the tenting, and waited.
In June 2020 I started to see success. The wood inside the port transom hole remained dry, even while the center and starboard holes continued showing moisture. By October, the center hole remained dry. Even though these two holes appeared to be dry, I continued running all three heaters “just to be sure.”
By early March 2021, after seventeen months of drying, the wood inside the starboard hole stayed dry. With the wood inside the other two transom holes remaining dry, I declared victory. Then moved to phase two of my transom-drying plan.
Sealing the Holes
My next step was to give the exposed wood some protect from future moisture So, I used some on all exposed surfaces. One benefit was that the amount of CPES the wood soaked up would indicate how much rot damage I had. It turned out the wood soaked up very little, a good indication the transom was still solid.
A garboard drain plug socket normally uses three #8 mounting screws. I had drilled pilot holes for each socket when I drilled the one inch drain holes. But, I wanted to protect the transom from possible future water intrusion damage as best as I could. So I overdrilled all the drain plug socket screw holes to one-quarter inch. I also overdrilled the transducer screw holes. Then, I used one-quarter inch oak dowel pins, previously soaked in CPES, to plug these holes. I used marine-grade epoxy to glue the pins into the holes. Once the epoxy cured, I redrilled pilot holes for mounting screws in the exposed dowel pin ends.
My theory is that the epoxy-coated dowel pins will give some rot protection to the transom core in the event of water intrusion. With this technique I’m also drilling screw holes into good oak wood, not the previously water-softened transom wood core. I think this provides more holding strength for the screw threads.
I remounted all three drain plugs and the transducer using marine sealant. Once set I installed the drain plugs. I used Teflon tape on the plug threads to ensure a watertight seal. I also plugged up the test hole I had drilled inside the transom using a 3/8″ diameter dowel plug, sealing it with epoxy.
Locating Source of the Leak
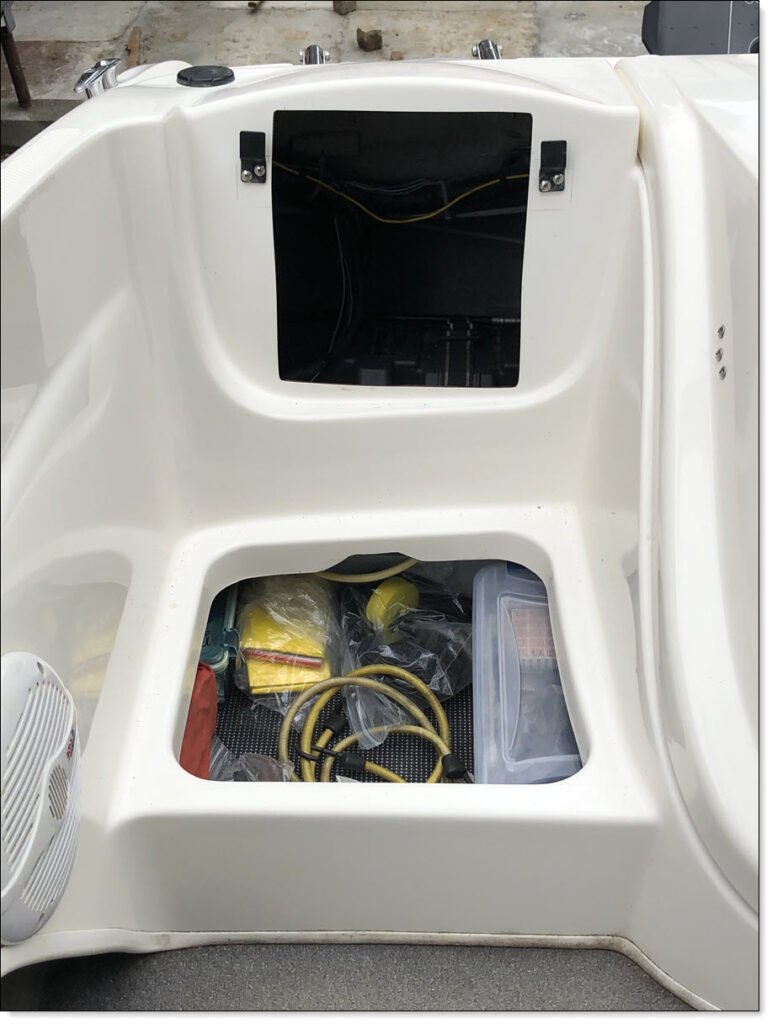
At this point, I still wasn’t sure where water was leaking into the transom. From the way it dried out, I was pretty sure the leak was on the starboard side. In that area there is an equipment bay with the tilt-and-trim hydraulic pump and the single battery mounted down on the deck. There’s also a number of cables and hoses, all screwed into the deck. Each mounting screw is a potential source of leaking. Due to the slope of my driveway where the boat is parked, any rainwater leaking through the water-tight cover tends to collect in that equipment bay. The fuel tank is mounted on the port side under and behind the port rear seat.
Leak Testing
I started using the boat again after plugging the transom holes. After each outing I would remove the two drain plugs to test for any water leaks. And, after almost every outing I would find water in one or both sides.
I removed and replaced the transom drain sockets several times that summer, trying to be sure I had the sockets sealed up correctly. Each time I removed the sockets I had to clean off the sealant, dry out the wood, and reseal in time for my next outing.
After one rainstorm water leaked through the cover and into the boat while it was parked in my driveway, pooling in the rear starboard equipment bay. Then, I saw water leaking out the starboard transom drain hole. A few weeks later, I could see water dripping out of the port transom drain, and discovered rainwater pooling in the port equipment bay.
So now I had proof that water was intruding through the deck of the rear equipment bays. I decided my fix was to remove the equipment mounted in the rear starboard equipment bay and reseal that deck. There wasn’t anything I could immediately do for the port side.
Phase Two – Waterproofing
We moved across town in December 2021. By the spring of 2022 I was still busy with new house stuff, so I deferred waterproofing until the following year. I did keep close check on water leaking out the transom drain holes. At the end of that season, I once again removed the two transom drain plug sockets and rigged my trusty 5-watt heaters to dry out the holes over the winter. I prepared the starboard equipment bay by removing the battery and mounts, all mounting crews on the tilt-and-trim hydraulic pump, and all screws holding cables and hoses in that area. All the screws were bagged and tagged, ready for spring work.
I also setup one of my 5-watt heaters inside the starboard equipment bay to dry out the wood.
Starting Work
In April I was finally able to start work. I disconnected the hydraulic hoses and wiring on the tilt-and-trim unit and pulled it out for full deck access in the equipment bay.
The wood deck has a topping of hard gelcoat. In the cockpit area (and into the rear storage area) carpeting is glued down on top of the gelcoat. In the equipment bay, the gelcoat topping is exposed. I ripped out the carpet in the rear storage area to expose the gelcoat, and cleaned out the sludge in the equipment bay as best I could. I found extensive cracking of the gelcoat in both areas, which exposed the underlying wood to water intrusion. Water leaking into the cracks apparently loosened the surrounding gelcoat from the wood.
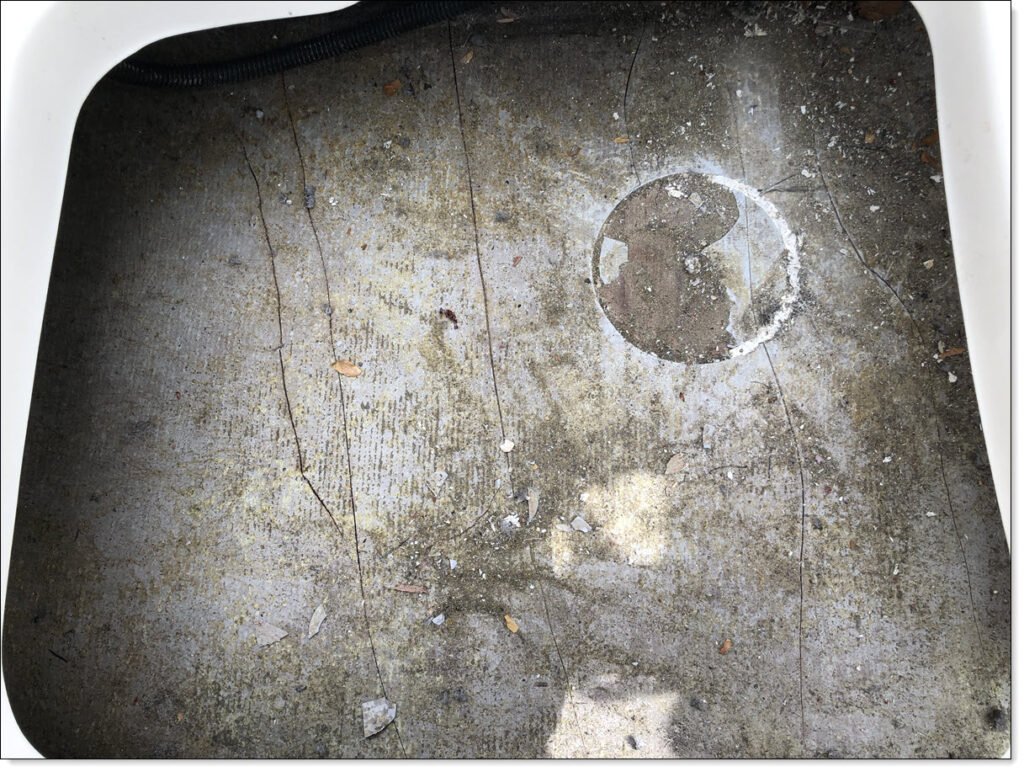
Using a three-inch rotary sander and a mouse sander I sanded down the gelcoat. After sanding I started chipping away loose gelcoat. And I found my holes.
The Source of the Leak
I discovered two holes in the wood decking, one and one-eight inches diameter each. One was near the back of the rear seat storage area, the other in middle of the equipment bay deck, right between the battery and pump. It appears those holes were used to shoot buoyancy foam after the deck was installed, which would make sense. But the foam came up level with the deck, so there was just a thin layer of gelcoat over the foam. There were cracks in the gelcoat across both holes, and it was obvious water had been getting in. In both holes, the exposed buoyancy foam was wet.

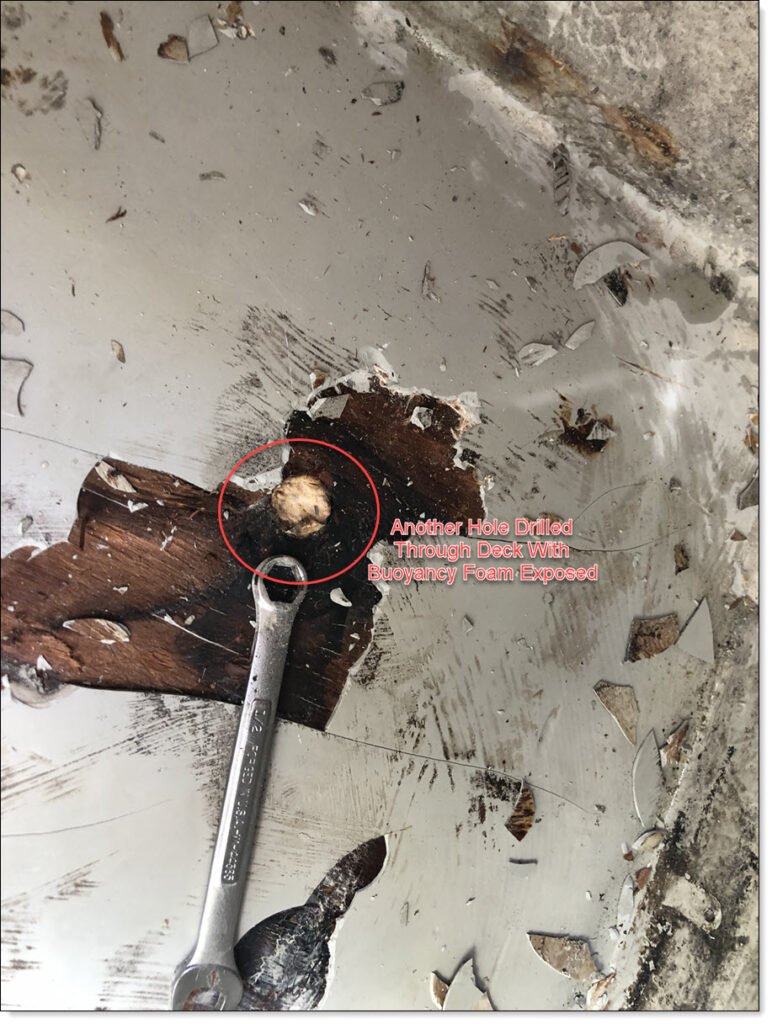
As much as I’m happy to pinpoint a cause, I remain annoyed at the poor quality workmanship. There’s no good reason, except manufacturing cost, that Bayliner didn’t do a better job of sealing up those holes. I suspect there’s matching holes under the portside fuel tank, also allowing water to leak into the buoyancy foam.
Resealing – Step One
Once I had chipped out all loose gelcoat and sanded everything clean, it was time to reseal. I had chipped out enough loose gelcoat, especially under the rear seat storage, that large areas of raw wood were exposed. In an attempt to reseal and level out the surface, I used a marine-grade epoxy putty to seal up the wood. The work was messier than I expected. The final results weren’t as smooth as I had hoped. But all the bare wood was resealed.
I did plug up the hole in the rear equipment bay with a thick layer of putty (after digging out some of the exposed buoyancy foam). I popped a one-inch drain tube into the hole under the rear seat and sealed it with putty, as a permanent drain/vent hole to help dry the foam. This type of tube works with rubber drain plugs, so I can seal the hole or open it up as needed.

Resealing – Step Two
After the epoxy putty setup, I sanded all decking again to smooth everything out. I stuck toothpicks in all the screw holes to make it easier to find them afterwards.
My final sealing work was to coat the deck with a layer of Durabak® polyurethane coating. This is a very tough, very durable, coating. I used it when I rebuilt the deck in my first boat Sea Dragon and was pretty impressed with it for marine work. I wiped the deck surfaces with xylene, let that clear, then rolled and brushed out a deep layer of light gray colored Durabak coating.
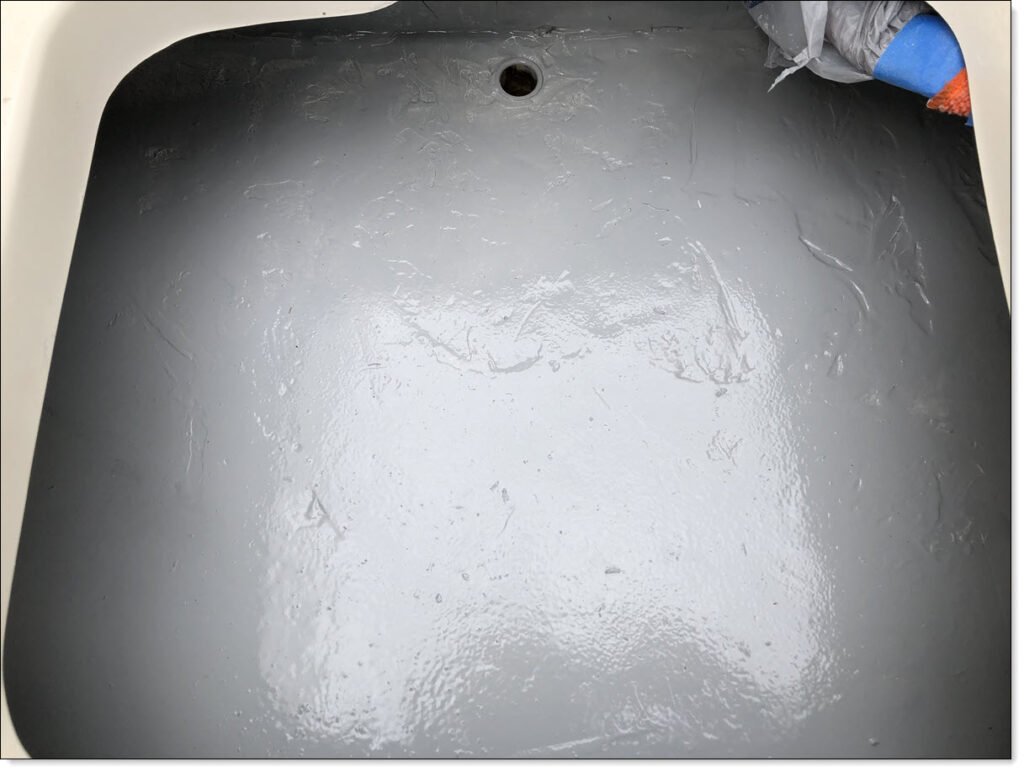
After two years of thinking and planning, the actual work only took a few minutes.
Packing It Up
Once the durabak coating cured, I reinstalled everything in the equipment bay. To help with waterproofing I used sealant in all the screw holes. I quickly determined that it was a lot easier to take stuff out then put it all back, working through the small rear seat opening and from the engine compartment. By the time I had all the cables, hoses, trim-and-tilt pump, and battery remounted many curses were said. I also had a number of bruises on top of my head from hitting the edges of the rear seat opening.
As a final thought, I drilled a one-inch hole on the port side and installed another one-inch drain tube with rubber plug. When I drilled this hole, I determined that the buoyancy foam was dry, so I’m fairly confident the main water intrusion was on the starboard side. But I still want to eventually seal up the port side. My tentative plan is to spray some expanding foam insulation in front of the fuel tank to keep water leaking through from the cockpit. That will probably be next year’s project, along with recoating more deck areas in the bilge and ski locker with Durabak.
As the final step in this project, I did wire in underwater blue lights through each of the transom drain holes. So I guess this work counts as another upgrade.

Final Thoughts
This is not a job I plan on doing again anytime soon. But I think my boat is more solid for doing this work. A rule of thumb in woodworking; it’s better to give water a way of draining, as opposed to trying to keep water from getting in. My boat now has four new drain/vent holes to keep the structural wood and buoyancy foam dry. There is still moisture in the starboard side buoyancy foam, but with no new water coming in, I’m confident it will dry out with time.
Boating-Related Posts
- Small Boat Hacks: Anchoring
- Boating Hacks: A Kayak Light Mast
- Boating Hacks: Sea Eagle Inflatable Kayaks
- Boating Hacks: Sea Eagle Skeg Guard
- Review: HO Sports Beacon Inflatable Kayak